Want to make a unique fashion statement? Learn how to make a wood ring and add a touch of rustic elegance to your accessories. Crafting your own wooden ring allows you to customize the design, choose different types of wood, and express your personal style.
Creating a wood ring is a fun and rewarding DIY project that doesn’t require advanced woodworking skills. With just a few tools and materials, you can create a stunning wooden ring that will be the envy of your friends.

Whether you’re a beginner or an experienced woodworker, this step-by-step guide will show you the techniques and tips needed to make a beautiful wooden ring that you can proudly wear or gift to someone special.
From choosing the right type of wood and sizing the ring to shaping, sanding, and finishing, this tutorial covers all the essential steps to create a polished and durable wood ring. Get ready to unleash your creativity and embark on a woodworking adventure!
Tools and Materials Needed for Wood Ring Making
If you’re interested in making your own wooden rings, there are a few essential tools and materials that you’ll need to get started. Whether you’re a seasoned woodworker or a beginner, having the right tools and materials will ensure that you can create beautiful, durable wooden rings. Here’s a list of the key items you’ll need:
Tools:
1. Lathe:
A lathe is a machine that is used to shape and turn wood. It is the primary tool needed for making wooden rings. There are different types of lathes available, including full-size lathes and mini-lathes. Choose one that suits your needs and budget.
2. Chisels:
Chisels are essential for cutting and shaping the wood on the lathe. You’ll need a variety of chisels, including gouges, parting tools, and skew chisels. These tools will help you create different designs and details on your rings.
3. Sandpaper and Sanding Pads:
Sanding is a crucial step in ring making to achieve a smooth and polished finish. You’ll need sandpaper in various grits, from coarse to fine, to sand the wood. Sanding pads are also useful for reaching smaller areas and achieving a professional finish.
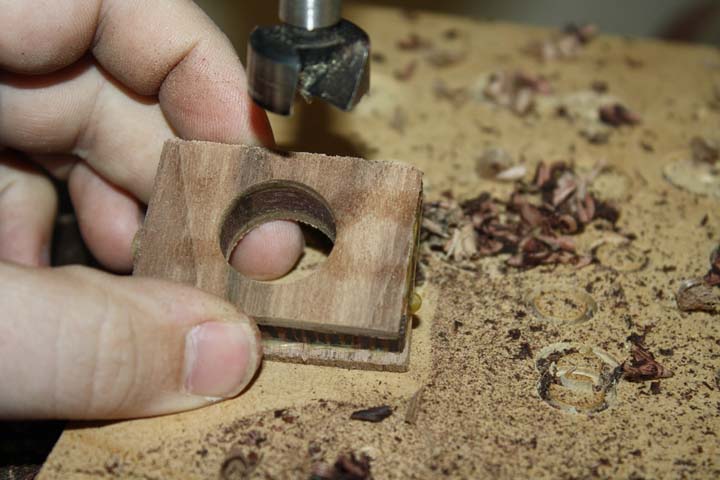
4. Drill Press:
A drill press is necessary for drilling holes in the wooden rings. It ensures accuracy and consistency in hole placement. You’ll need drill bits of varying sizes to create different-sized holes for finger sizes and inlays.
5. Saw:
A saw is required for cutting the wooden blanks into ring-sized pieces. A bandsaw or scroll saw is commonly used for this task. Choose a saw that is suitable for cutting small pieces of wood accurately.
6. Clamps:
Clamps are handy for holding the wood securely in place while working on it. They help prevent movement and ensure stability during shaping, drilling, and sanding.
Materials:
1. Wood:
Choosing the right wood is crucial for making high-quality wooden rings. Consider using hardwoods like maple, walnut, or rosewood for their durability and aesthetic appeal. Make sure the wood is seasoned and free from defects.
2. Finishing Materials:
To protect and enhance the appearance of your wooden rings, you’ll need finishing materials such as wood sealers, oils, or varnishes. These will provide a protective layer and bring out the natural beauty of the wood.
3. Inlays (Optional):
If you want to add decorative elements or personalization to your wooden rings, you can incorporate inlays. These can be made from various materials such as metal, gemstones, or other types of wood. Inlays can add a unique touch to your rings.
By gathering these tools and materials, you’ll be well-equipped to start making your own custom wooden rings. Remember to prioritize safety while working with power tools and always follow the manufacturer’s instructions. With practice and creativity, you’ll be able to produce stunning wooden rings that are not only beautiful but also meaningful.
Step-by-Step Guide for Shaping and Sanding the Wood Ring
Creating a wooden ring can be a rewarding and creative project. Whether you’re a jewelry enthusiast or a woodwork lover, shaping and sanding a wood ring allows you to showcase your craftsmanship. In this section, we will provide you with a step-by-step guide on how to shape and sand a wooden ring to perfection.
Materials Needed
- Wood blank
- Ring mandrel
- Sanding paper (various grits)
- Woodworking tools (e.g., bandsaw, lathe)
- Safety goggles
- Dust mask
Step 1: Choose the Wood
The first step in shaping and sanding a wood ring is choosing the right type of wood. Look for a sturdy and durable wood that is suitable for jewelry making. Popular choices include hardwoods like maple, walnut, and cherry. Make sure the wood is dry and free from any cracks or defects.
Step 2: Mark and Cut the Blank
Using a ring mandrel as a guide, mark the desired size of your ring on the wood blank. Ensure that the width of the ring is proportional to the size of the finger it will be worn on. Once marked, use a bandsaw or a coping saw to carefully cut out the ring blank.
Step 3: Shape the Ring
Now that you have the ring blank, it’s time to shape it. Depending on the tools available, you can use a lathe or hand files to shape the wood. If using a lathe, secure the ring blank on the mandrel and carefully remove excess material to achieve the desired shape. If using hand files, slowly and gently shape the ring, constantly checking for symmetry and comfort.
Step 4: Sand the Ring
Once the ring is shaped, it’s time to sand it to a smooth finish. Start with a coarse-grit sandpaper, around 80 or 100 grit, and gradually work your way up to finer grits, such as 220 and 400. Use a sanding block or wrap the sandpaper around a dowel to maintain a consistent shape. Sand in a circular motion, applying even pressure, until the surface is smooth and free from any rough spots.
Step 5: Refine the Details
After sanding, inspect the ring for any imperfections or rough edges. Use finer sandpaper or sanding sticks to refine the details and achieve a polished look. Pay close attention to the inside of the ring to ensure a comfortable fit. Take your time and make adjustments until you are satisfied with the final result.
Step 6: Apply a Finish
Once the ring is sanded and shaped to your liking, you can choose to apply a finish to protect and enhance the wood. Options include natural oils, wax, or a polyurethane sealant. Apply the finish according to the manufacturer’s instructions and allow it to dry completely before wearing the ring.
In summary, shaping and sanding a wood ring requires careful attention to detail and a steady hand. By following this step-by-step guide, you can create a beautiful wooden ring that showcases your craftsmanship and creativity. Remember to prioritize safety by wearing protective gear and taking breaks if needed. Happy woodworking!
Adding a Personalized Touch: Wood Ring Decoration Ideas
Wooden rings are not only a unique and eco-friendly alternative to traditional metal rings but also offer a plethora of opportunities for personalization. Whether you are looking for a wedding ring, an anniversary gift, or simply a fashionable accessory, adding a personalized touch to your wood ring can make it truly special and one-of-a-kind. In this section, we will explore some creative wood ring decoration ideas that will allow you to express your individuality and create a meaningful piece of jewelry.
1. Engraving
Engraving is a classic and timeless way to personalize a wood ring. You can choose to engrave the inside or outside of the ring with meaningful words, names, dates, or symbols. This can include initials of you and your partner, a special quote, or even a significant location. The engraving can be done using a laser, which creates precise and detailed designs on the wood surface. It adds a subtle yet elegant touch to your ring and serves as a constant reminder of a special moment or person.
2. Inlay
Inlay is a technique that involves embedding a different material, such as metal, stone, or resin, into the wood surface of the ring. This allows you to incorporate additional colors, textures, and patterns to enhance the overall design. You can choose to have a small inlay on the outside of the ring, such as a thin strip of gold or silver, or go for a more intricate design with multiple inlays. The options are endless, and you can tailor the inlay to reflect your personal style, interests, or even a shared passion with your partner.
3. Wood Burning
Wood burning, also known as pyrography, is the art of creating designs or patterns on wood by burning it with a heated tool. This technique allows you to add intricate details and unique designs to your wood ring. You can opt for a simple and elegant pattern or go for a more complex illustration that holds a special meaning to you. From nature-inspired motifs to geometric patterns or even personalized portraits, wood burning opens up a world of possibilities for customization.
4. Gemstone Accent
If you want to add a touch of sparkle to your wood ring, consider incorporating a gemstone accent. You can choose a small gemstone, such as a diamond, sapphire, or emerald, and have it set into the wood. This adds a pop of color and a dazzling shine to your ring, while still maintaining the natural and rustic appeal of the wood. The gemstone can symbolize a birthstone, anniversary, or simply be your favorite color. The contrast between the earthy wood and the vibrant gemstone creates a beautiful and eye-catching combination.
5. Custom Inscripted Message
Creating a custom inscripted message on the inside of the wood ring allows you to keep a secret, personal reminder close to your heart. It can be a hidden love note, a message of encouragement, or even a special code shared between you and your partner. The message can be engraved using delicate calligraphy or a simple block font, depending on your preference. This hidden inscription adds a sentimental touch to your ring and makes it a truly unique and cherished piece of jewelry.
In summary, personalizing a wood ring offers an opportunity to create a meaningful and unique piece of jewelry. Whether through engraving, inlay, wood burning, gemstone accents, or custom inscriptions, there are numerous ways to add your own personal touch to a wood ring. The end result will be a stunning and sentimental piece that reflects your individuality and serves as a lasting reminder of a special moment or person in your life.
Finishing and Sealing Your Wood Ring for Longevity
When it comes to crafting a wood ring, one of the most important steps is finishing and sealing the wood. This not only enhances the overall appearance of the ring, but also protects the wood from moisture, dirt, and everyday wear and tear. In this section, we will explore the different methods and products you can use to finish and seal your wood ring for longevity.
1. Sanding and Smoothing
Before applying any finish or sealant, it is crucial to sand and smooth the surface of the wood ring. Start with a coarse-grit sandpaper to remove any rough spots, and gradually work your way up to a fine-grit sandpaper for a smooth finish. This step not only helps to create a polished and professional look, but also prepares the wood for better absorption of the finish.
2. Stain or Dye
Once the wood ring is sanded and smoothed, you have the option to add color using a stain or dye. Stains are available in various shades and can enhance the natural beauty of the wood grain. Dyes, on the other hand, penetrate the wood fibers and offer a more vibrant and even color. Choose a product that is specifically designed for wood and follow the manufacturer’s instructions for application.
3. Applying a Finish
After adding color, it’s time to apply a finish to protect the wood and give the ring a polished look. There are several types of finishes available, including varnish, lacquer, and polyurethane. Each has its own advantages and drawbacks, so it’s important to choose one that suits your preferences and the type of wood you are working with. Apply the finish using a brush or a soft cloth, following the grain of the wood, and allow it to dry thoroughly before proceeding to the next step.
4. Sealing the Wood
To ensure the longevity of your wood ring, sealing the wood is essential. This step adds an extra layer of protection against moisture and prevents the wood from warping or cracking over time. There are various sealants available, such as epoxy resin or cyanoacrylate glue, that provide a durable and waterproof barrier. It’s important to carefully apply the sealant to all surfaces of the wood ring and allow it to cure completely according to the manufacturer’s instructions.
5. Buffing and Polishing
Once the finish and sealant have dried and cured, it’s time to give your wood ring a final touch-up. Use a soft cloth or a buffing wheel to gently buff the surface, removing any imperfections or smudges. This step helps to achieve a smooth and glossy finish, giving your wood ring a professional and refined appearance.
6. Regular Maintenance
Even with proper finishing and sealing, it’s important to remember that wood is a natural material and requires regular maintenance to keep it in optimal condition. Avoid exposing your wood ring to excessive moisture, direct sunlight, or harsh chemicals, as these can damage the finish and the wood itself. Instead, clean your wood ring with a soft cloth and store it in a dry and cool place when not in use.
Summary
Finishing and sealing your wood ring is crucial for its longevity and overall appearance. By following the steps outlined above, you can achieve a beautiful, protected, and long-lasting wood ring that will be cherished for years to come. Remember to choose the right products, apply them carefully, and regularly maintain your wood ring to ensure its durability and beauty.
Frequently Asked Questions
1. How can I make a wood ring?
To make a wood ring, you will need a piece of wood with the desired thickness and width, a ring mandrel or a dowel rod, a coping saw or scroll saw, sandpaper, and wood glue. Trace and cut out the inner and outer diameter of the ring, shape it using the saw, sand it to smoothness, and then glue the edges together. Finish it with a protective coating.
2. What type of wood is best for making a wood ring?
Hardwoods like walnut, oak, maple, or cherry are commonly used for making wood rings as they are durable and have a beautiful grain pattern. However, softer woods like pine or cedar can also be used for a more rustic look. It’s important to choose a wood that is dense enough to withstand the wear and tear of daily use.
3. Can I make a wood ring without any woodworking experience?
Yes, you can make a wood ring without any woodworking experience. There are many tutorials and guides available online that provide step-by-step instructions and techniques. Starting with simpler designs and using basic tools like a coping saw can help beginners. With practice and patience, you can create unique and beautiful wood rings.
Conclusion
In conclusion, crafting a wood ring can be a fascinating and fulfilling project for anyone with a passion for woodworking. By following the steps outlined in this guide, you can create a unique and beautiful ring that showcases the natural beauty and warmth of wood.
Not only does making a wood ring allow you to express your creativity, but it also provides an opportunity to personalize your jewelry collection or create a meaningful gift for someone special. Whether you choose to use exotic hardwoods, reclaimed lumber, or a combination of both, the possibilities for design and customization are endless.
Remember to take your time, pay attention to detail, and enjoy the process. With practice and patience, you can master the art of making wood rings and create wearable pieces of art that are sure to be cherished for years to come.
