If you’re looking to create a unique and sturdy wood shield, you’ve come to the right place. Crafting a wood shield can be a rewarding project that allows you to showcase your creativity and craftsmanship skills. By following a few simple steps, you can make a one-of-a-kind wood shield that is both functional and visually appealing.
The first step in making a wood shield is to choose the type of wood you want to use. Popular options include oak, pine, and birch, as they are durable and relatively easy to work with. Once you have selected your wood, you will need to carefully measure and mark the desired size and shape of your shield.

Next, it’s time to cut out the shield shape from the wooden plank using a saw. Take your time to ensure smooth and precise cuts. After cutting out the shape, you can use sandpaper to smooth the edges and corners, creating a finished look.
Once you have the basic shape of your shield, you can add decorative elements if desired. This could include carving intricate designs, adding metal accents, or painting unique patterns. Be sure to let your creativity shine through during this step.
After adding any decorative elements, it’s important to protect the wood with a finish or sealant. This will not only enhance the overall appearance of your wood shield but also provide protection against moisture and wear. Choose a finish that is suitable for wood and apply it according to
Understanding the Tools and Materials Needed
Before starting any project, it is important to have a clear understanding of the tools and materials that will be required. This will help ensure that you have everything you need to complete the project efficiently and effectively. In this section, we will discuss the various tools and materials that may be needed for different types of projects.
1. Tools
Tools play a crucial role in any project, as they enable you to carry out the necessary tasks with precision and accuracy. The specific tools required will depend on the nature of the project, but some common tools include:
- Hammer: A versatile tool used for driving nails and removing them.
- Screwdriver: Used for inserting and removing screws.
- Wrench: Designed to tighten and loosen nuts and bolts.
- Measuring Tape: Essential for measuring lengths and distances accurately.
- Saw: Used for cutting materials such as wood or metal.
- Drill: Allows you to create holes in various materials.
- Pliers: Useful for gripping and manipulating objects.
- Level: Ensures that surfaces are straight and level.
- Paintbrushes: Used for applying paint or other finishes.
These are just a few examples of the tools that may be needed for a project. It is important to assess the specific requirements of your project and acquire the necessary tools accordingly.
2. Materials
In addition to tools, projects often require a range of materials to complete. The materials needed will vary depending on the project, but some common materials include:
- Wood: Used for construction, furniture making, and other applications.
- Metal: Can be used for structural purposes or as decorative elements.
- Concrete: Used for building foundations, driveways, and other structures.
- Paint: Used to enhance the appearance of surfaces and provide protection.
- Fasteners: Including nails, screws, bolts, and adhesives for joining materials together.
- Electrical components: Such as wires, switches, and outlets for electrical projects.
- Plumbing supplies: Including pipes, fittings, and valves for plumbing projects.
It is important to carefully consider the materials required for your project and ensure that you have an adequate supply before starting. This will help prevent delays and ensure smooth progress.
3. Safety Equipment
Safety should always be a top priority when undertaking any project. It is essential to have the necessary safety equipment on hand to protect yourself and others. Some common safety equipment includes:
- Safety goggles: To protect your eyes from dust, debris, and other hazards.
- Protective gloves: To safeguard your hands from cuts, chemicals, or other injuries.
- Hard hat: Essential for head protection in construction or renovation projects.
- Ear protection: Such as earplugs or earmuffs to reduce noise-related risks.
- Dust masks: To prevent inhalation of harmful particles or fumes.
Always prioritize safety by wearing the appropriate safety equipment and following proper safety protocols throughout the project.
Summary
Understanding the tools and materials needed is crucial for successfully completing any project. By familiarizing yourself with the specific tools, materials, and safety equipment required, you can ensure that you have everything you need to proceed efficiently and safely. Remember to assess the requirements of your project and acquire the necessary resources beforehand to avoid any delays or interruptions. Safety should always be a top priority, so don’t forget to wear the appropriate safety equipment and follow safety guidelines throughout the project.
Designing and Planning your Wood Shield
When it comes to creating a wood shield, careful designing and planning are crucial to ensure a successful outcome. Whether you are making a shield for decorative purposes or for functional use, following a well-thought-out design and planning process will help you achieve the desired results. In this section, we will walk you through the steps to design and plan your wood shield.
1. Determine the Purpose
The first step in designing and planning your wood shield is to determine its purpose. Are you creating a shield for display purposes, such as a wall hanging, or do you intend to use it for protection in activities like reenactments or medieval combat? Understanding the purpose of your shield will guide the overall design and size considerations.
2. Choose the Shape and Size
Next, you need to decide on the shape and size of your wood shield. Traditional shield shapes include round, oval, or kite-shaped, but you can also get creative and design a unique shape that suits your preferences. Consider the scale of your intended use and ensure the size is manageable.
3. Select the Wood Type
Choosing the right type of wood is essential for a sturdy and durable shield. Hardwoods like oak, maple, or birch are ideal choices due to their strength and resistance to impact. Softwoods like pine can be used for decorative purposes but may not provide the same level of durability. Consider the availability and cost of the wood as well.
4. Sketch the Design
Before starting the construction process, it is helpful to sketch your shield design on paper or use graphic design software. This will allow you to visualize the final product and make any necessary adjustments before committing to the build. Pay attention to details such as the placement of straps or handles and any decorative elements you plan to incorporate.
5. Gather the Materials and Tools
Once your design is finalized, gather all the materials and tools needed to construct your wood shield. This may include the chosen wood, screws or nails, sandpaper, paint or stain, and any decorative accents. Ensure that you have the necessary tools such as a saw, drill, sanding block, and paintbrushes to complete the project.
6. Prepare the Wood
Before assembling the shield, prepare the wood by sanding it to a smooth finish. This will help remove any rough edges or splinters and provide a clean surface for painting or staining. Take your time in this step to ensure a professional-looking final product.
7. Construct the Shield
Using your design as a guide, begin constructing the shield by cutting the wood into the desired shape. Depending on the design, you may need to attach multiple pieces together. Use screws or nails to secure the components in place, ensuring a sturdy construction. Take care to follow the design accurately to achieve the desired result.
8. Finishing Touches
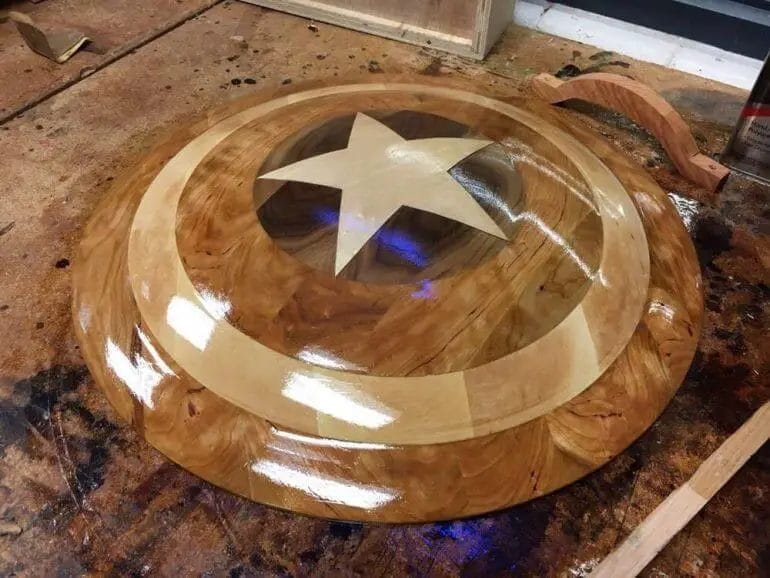
After the shield is assembled, apply any desired finish such as paint, stain, or varnish to protect the wood and enhance its appearance. You can also add decorative elements like metal accents, leather straps, or painted designs to personalize your shield further.
9. Testing and Final Adjustments
Once your wood shield is complete, it’s essential to test its functionality if it is intended for use in combat or protection. Assess its weight, balance, and maneuverability to ensure it meets your requirements. Make any necessary adjustments to optimize its performance before considering the project finished.
In summary, designing and planning a wood shield involves determining its purpose, selecting the shape and size, choosing the right wood type, sketching the design, gathering materials and tools, preparing the wood, constructing the shield, adding finishing touches, and conducting testing and final adjustments. By following these steps, you can create a well-designed and functional wood shield that meets your needs and showcases your creativity.
Building and Assembling the Shield
Now that we have gathered all the necessary materials, it’s time to start building and assembling our shield. Follow these step-by-step instructions to create a sturdy and functional shield:
- Cut the shield shape: Begin by drawing the desired shape of your shield onto the plywood sheet. Use a pencil or marker to outline the shape, making sure it is symmetrical and proportionate. Once you are satisfied with the design, carefully cut along the lines using a jigsaw or a similar cutting tool. Remember to take safety precautions and wear protective gloves and eyewear.
- Sand the edges: After cutting the shield shape, use sandpaper to smooth out any rough edges. This will ensure a clean and polished look for your shield.
- Paint the shield: Now it’s time to add some color and design to your shield. Choose a paint color that matches your desired theme or personal preference. Apply a primer coat to the shield first, and once it has dried, apply the main paint color. You can use brushes or spray paint for this step. Don’t forget to let each coat dry before applying the next.
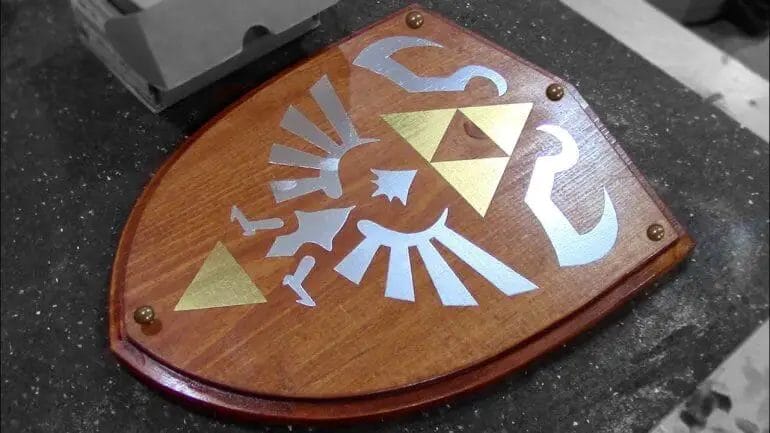
- Add decorative elements: To enhance the visual appeal of your shield, consider adding decorative elements such as emblems, symbols, or patterns. These can be painted on or attached using adhesive or small nails. Get creative and make your shield unique!
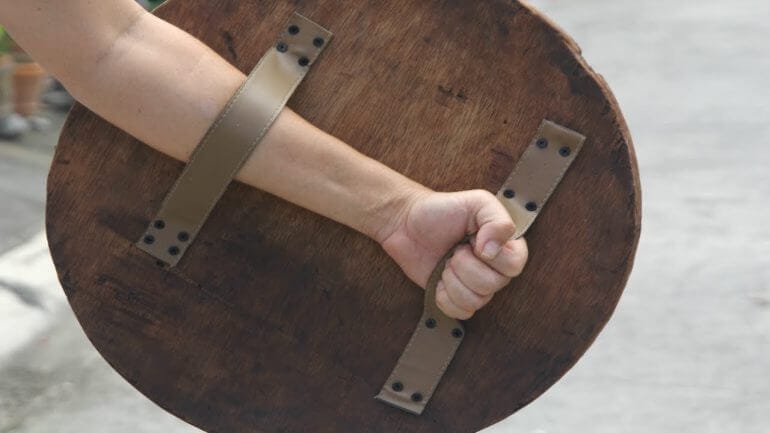
- Attach the handle: To ensure easy maneuverability, you will need to attach a handle to the back of the shield. You can use a sturdy leather strap, a wooden dowel, or even a metal handle. Make sure it is securely fastened to the shield, as it will bear the weight when you hold it.
- Apply a protective finish: To protect the paint and prolong the lifespan of your shield, apply a clear coat or varnish. This will add a layer of protection against scratches and weathering.
Once you have completed all the steps above, your shield should be ready for use. Remember to handle it with care and store it in a safe place when not in use. Building your own shield can be a rewarding and creative project, allowing you to showcase your individuality and craftsmanship. So go ahead, give it a try, and prepare to defend yourself in style!
Finishing and Decorating your Wood Shield
After constructing your wood shield, the next step is to finish and decorate it to enhance its appearance and durability. This process involves treating the wood surface, applying a protective finish, and adding decorative elements to personalize your shield. In this section, we will discuss the steps and techniques involved in finishing and decorating your wood shield.
Treating the Wood Surface
Before applying any finish, it is important to prepare the wood surface properly. Start by sanding the shield with progressively finer grit sandpaper to create a smooth and even surface. This will help the finish adhere better and prevent any rough spots.
Next, clean the shield surface to remove any dust or debris. You can use a damp cloth or a tack cloth specifically designed for this purpose. Make sure the surface is completely dry before proceeding to the next step.
Applying a Protective Finish
Applying a protective finish to your wood shield is crucial to protect it from moisture, UV rays, and general wear and tear. There are various types of finishes available, including varnish, lacquer, shellac, and polyurethane. Choose a finish that suits your preferences and provides the desired level of protection.
Before applying the finish, make sure to read the manufacturer’s instructions and follow the recommended application techniques. Use a brush or a cloth to apply an even coat of finish to the surface of the shield. Allow it to dry according to the manufacturer’s instructions, and then lightly sand the surface with fine-grit sandpaper to create a smooth finish. Repeat this process for multiple coats, if necessary, to achieve the desired level of protection and aesthetics.
Adding Decorative Elements
Once you have finished applying the protective finish, you can proceed to add decorative elements to personalize your wood shield. This can include painting, staining, carving, or adding metal accents.
If you choose to paint your shield, select high-quality acrylic or enamel paints that are suitable for wood surfaces. Use brushes of various sizes to create intricate designs or add bold colors to make your shield stand out. Allow the paint to dry completely between coats and consider using a clear varnish or topcoat to protect the painted surface.
Staining the wood shield is another option that adds richness and depth to the natural grain of the wood. Choose a stain color that complements the wood species and apply it evenly with a brush or cloth. Wipe off any excess stain and allow it to dry thoroughly before applying a protective topcoat.
Carving intricate designs or patterns onto the wood shield is a traditional way to add decorative elements. You can use carving tools or wood burning techniques to create unique patterns or symbols that hold meaning for you. Take your time and work slowly and precisely to achieve the desired results.
Adding metal accents, such as brass or copper embellishments, can also elevate the look of your wood shield. These can be attached using screws, nails, or adhesives, depending on the design and materials used. Ensure that the fasteners are secure and do not compromise the integrity of the shield.
Summary
Finishing and decorating your wood shield is an important step in the construction process. Treating the wood surface with sanding and cleaning prepares it for the application of a protective finish. Applying a suitable finish protects the shield from damage and enhances its appearance. Adding decorative elements, such as painting, staining, carving, or metal accents, allows you to personalize your wood shield and make it unique to your style and preferences.
FAQs
How can I make a wood shield?
To make a wood shield, you will need a wooden board, a saw, sandpaper, a drill, and a leather strap. Start by cutting the wooden board into a circular shape using the saw. Then, sand down the edges to make them smooth. Next, drill holes on one side of the shield for the leather strap to go through. Finally, attach the leather strap and your wood shield will be ready to use!
What type of wood should I use to make a shield?
When making a wood shield, it is recommended to use a strong and durable type of wood such as oak, plywood, or birch. These types of wood are sturdy enough to withstand impact and provide good protection.
Do I need any special tools to make a wood shield?
While you can make a wood shield with basic tools like a saw and sandpaper, having additional tools like a drill and clamps can make the process easier. These tools will help you create holes for the leather strap and hold the wood securely in place while you work on it.
Conclusion
In conclusion, crafting a wood shield can be a rewarding and fulfilling project for woodworking enthusiasts. With the right tools, materials, and techniques, you can create a functional and aesthetically pleasing shield. Whether you’re interested in historical reenactments, cosplay, or simply want a unique decorative piece, making a wood shield allows you to showcase your creativity and skills.
Remember to choose the appropriate type of wood for your shield, such as oak or maple, as these woods offer durability and strength. Plan out your design, taking into consideration the shape, size, and any additional embellishments you want to incorporate. Properly sanding, shaping, and finishing the wood will result in a smooth and polished shield.
Lastly, don’t forget to add straps or handles to ensure a comfortable grip and secure attachment. By following these steps and putting your personal touch on the project, you’ll have a unique wood shield that combines functionality and artistic expression.
