If you’re looking to add a touch of rustic charm to your home or outdoor space, creating a wood lantern is a perfect DIY project. Crafting your own wood lantern allows you to customize its size, shape, and design to match your personal style. Whether you want to use it as a decorative piece or a functional lighting source, making a wood lantern is a rewarding and enjoyable endeavor. With a few materials and some basic woodworking skills, you can create a stunning wood lantern that will illuminate any space with warmth and beauty.
To get started, gather your materials which include wood boards, a saw, sandpaper, wood glue, clamps, and a drill. Choose the type of wood that suits your preference – cedar, pine, or birch are popular choices. Next, measure and cut the wood boards according to the desired size of your lantern. Remember to consider the dimensions for the sides, base, and top sections of the lantern.
Once your wood pieces are cut, sand down any rough edges or surfaces to ensure a smooth finish. Sanding also helps the wood to absorb any paint or stain you may choose to apply later on. After sanding, assemble the lantern by gluing the pieces together and securing them with clamps until the glue dries. This step will give your lantern stability and strength.
Now it’s time to add the finishing touches to your wood lantern. You can choose to paint the lantern in your preferred color
Choosing the Right Type of Wood for Your Lantern
When it comes to selecting wood for your lantern, it’s essential to consider both aesthetics and durability. The type of wood you choose will impact not only the overall look of your lantern but also its longevity and ability to withstand environmental conditions. In this section, we will explore some popular wood choices for lantern construction and discuss their unique qualities.
1. Oak Wood
Oak wood is a classic choice for lanterns due to its strength and durability. It has a beautiful grain pattern that adds a touch of elegance to any design. Oak is highly resistant to decay and can withstand exposure to moisture, making it suitable for both indoor and outdoor lanterns. It is also readily available and relatively affordable.
2. Cedar Wood
Cedar wood is known for its natural resistance to insects and rot, making it a popular choice for outdoor lanterns. It has a distinct aroma that adds a pleasant scent to your space. Cedar is lightweight, making it ideal for portable lanterns. It also has a distinctive grain pattern that enhances the visual appeal of your lantern.
3. Mahogany Wood
Mahogany wood is prized for its rich, reddish-brown color and durability. It has a straight grain pattern that gives your lantern a sleek and refined look. Mahogany is resistant to rot and decay, making it suitable for outdoor use. It is also relatively easy to work with, allowing for intricate designs and detailing.
4. Bamboo Wood
Bamboo wood is a sustainable and eco-friendly choice for lantern construction. It is known for its lightness, strength, and flexibility. Bamboo has a unique grain pattern that adds a natural and organic touch to your lantern. It is resistant to moisture and can withstand outdoor conditions when properly treated. Bamboo is also a fast-growing material, making it readily available.
When selecting the right type of wood for your lantern, it’s important to consider your specific needs and preferences. Think about the intended use of your lantern, whether it will be indoors or outdoors, and the overall aesthetic you want to achieve. It’s also crucial to properly maintain and treat your wooden lantern to ensure its longevity and preserve its natural beauty.
Step-by-Step Guide to Building a Wood Lantern
Have you ever wanted to add a touch of rustic charm to your home decor? Building a wood lantern can be a fun and rewarding project that allows you to create a beautiful and functional piece of decor. In this step-by-step guide, we will take you through the process of building your own wood lantern. Whether you are a seasoned woodworker or a beginner, this project can be easily accomplished with a few basic tools and materials.
Materials You Will Need:
- Wood boards (such as pine or cedar)
- Saw
- Sandpaper
- Wood glue
- Nails or screws
- Paint or stain
- Wire or rope for handle
- Glass panels
Step 1: Design and Measurements
The first step in building a wood lantern is to decide on the size and design of your lantern. Consider the purpose of the lantern and where you plan to use it. Measure and mark the dimensions on your wood boards, ensuring that you have enough material for all the sides, as well as the top and bottom of the lantern.
Step 2: Cutting the Pieces
Using a saw, carefully cut the wood boards according to your measurements. It is essential to make precise cuts to ensure that all the pieces fit together properly. Take your time and use a steady hand to achieve clean and accurate cuts.
Step 3: Sanding the Edges
After cutting the pieces, use sandpaper to smooth out any rough edges or splinters. This step is crucial for achieving a professional-looking finish. Be sure to sand all the sides and corners of each piece to create a uniform and smooth surface.
Step 4: Assembling the Lantern
Start by applying wood glue to the edges of the bottom piece and attach the four side pieces, forming a box shape. Press the pieces firmly together and secure them with nails or screws for added stability. Allow the glue to dry according to the manufacturer’s instructions.
Step 5: Adding the Top
Attach the top piece of the lantern using the same method as in step 4. Ensure that it fits securely and is aligned with the sides of the lantern. Use nails or screws to hold the top piece in place, and let the glue dry completely.
Step 6: Finishing Touches
Now it’s time to add your personal touch to the wood lantern. You can paint or stain the lantern to match your desired aesthetic. Consider using a weather-resistant finish if you plan to use the lantern outdoors. Once the paint or stain has dried, attach the glass panels to all four sides of the lantern using wood glue or a clear adhesive.
Step 7: Adding a Handle
If desired, you can add a handle to your wood lantern for easy transportation. Secure a wire or rope handle to the top of the lantern using screws or nails. Make sure it is sturdy enough to support the weight of the lantern.
In summary, building a wood lantern is a satisfying project that allows you to showcase your creativity and woodworking skills. By following this step-by-step guide, you can create a beautiful and functional wood lantern that will add a touch of rustic charm to your home decor. Enjoy the process of building your own lantern and admire the final result of your craftsmanship.
Adding Personalized Touches to Your Wood Lantern Design
Wood lanterns are a beautiful and versatile addition to any home decor. They add warmth and character to your space, and can be customized to reflect your personal style and taste. In this section, we will explore some creative ways to add personalized touches to your wood lantern design.
Choosing the Right Wood
The first step in creating a personalized wood lantern is selecting the right type of wood. Different types of wood have unique characteristics and grain patterns, which can greatly impact the overall look and feel of your design. Some popular choices for wood lanterns include oak, pine, cedar, and birch. Consider the color, texture, and durability of the wood when making your selection.
Adding Engravings or Carvings
One of the most popular ways to personalize a wood lantern is by adding engravings or carvings. This allows you to showcase your creativity and create a design that is truly one-of-a-kind. You can engrave names, initials, meaningful quotes, or intricate patterns onto the surface of the lantern. Consider using a wood burning tool or seeking the help of a professional woodworker to achieve the desired level of detail.
Painting or Staining
If you prefer a splash of color or a more polished look, consider painting or staining your wood lantern. This allows you to match the lantern to your existing home decor or create a focal point with a bold, vibrant color. Keep in mind that painting or staining will alter the natural appearance of the wood, so make sure to choose a finish that complements your desired aesthetic.
Adding Decorative Accents
To further personalize your wood lantern, consider adding decorative accents such as metal hardware, beads, or ribbon. These small touches can elevate the overall design and make your lantern truly unique. For example, you can attach metal handles to the sides of the lantern for a rustic look, or wrap ribbon around the handle for a more delicate and feminine touch.
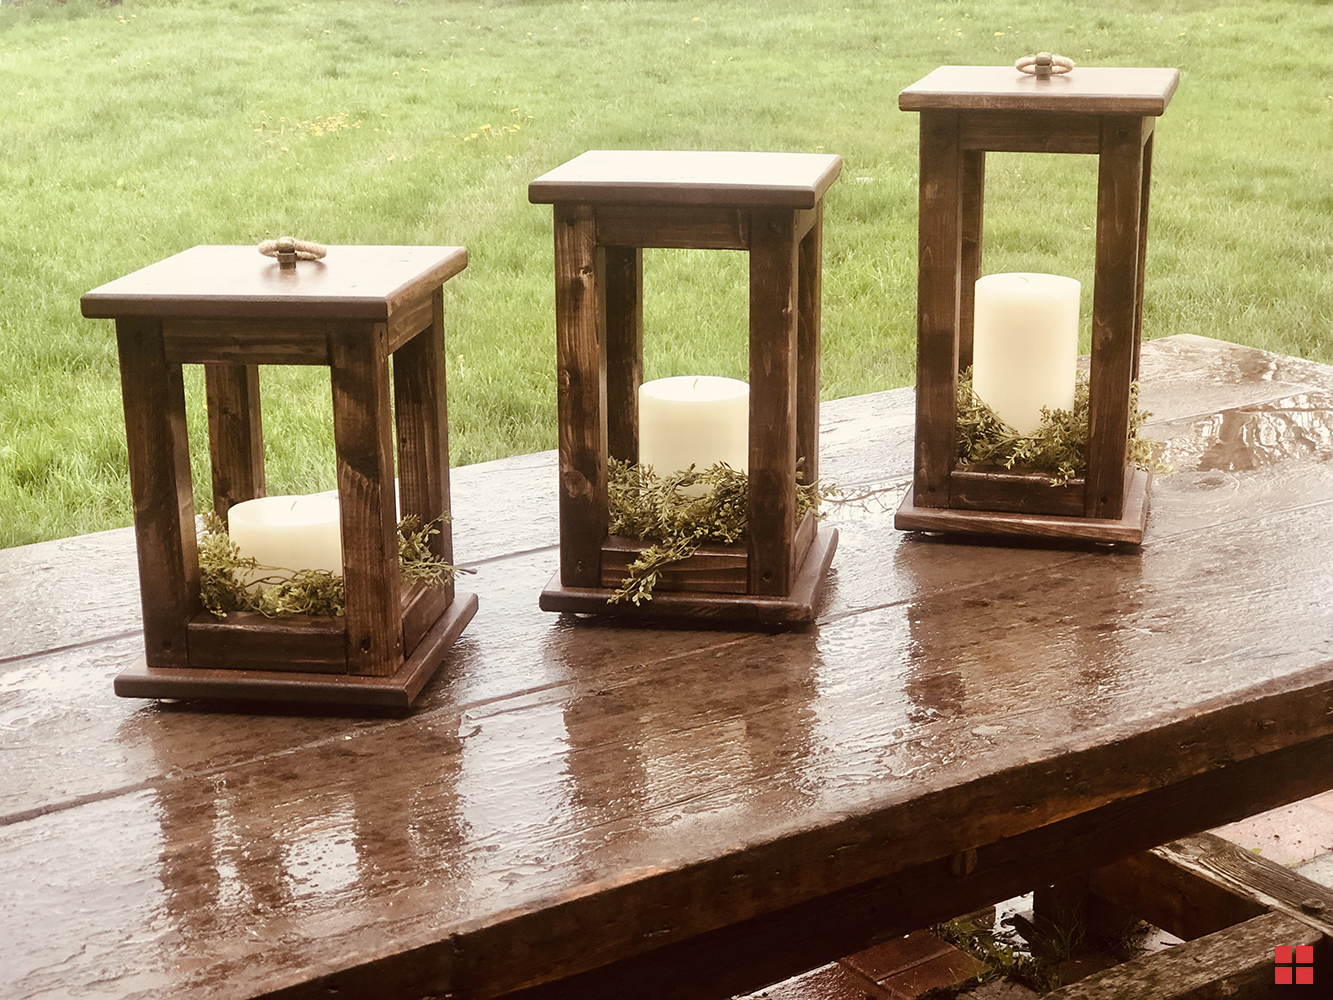
Incorporating Glass Panels
If you want to add a touch of elegance and sophistication to your wood lantern, consider incorporating glass panels. These panels can be inserted into the sides of the lantern, allowing the soft glow of candlelight to illuminate the surrounding area. Choose frosted or stained glass for a more diffused and enchanting effect.
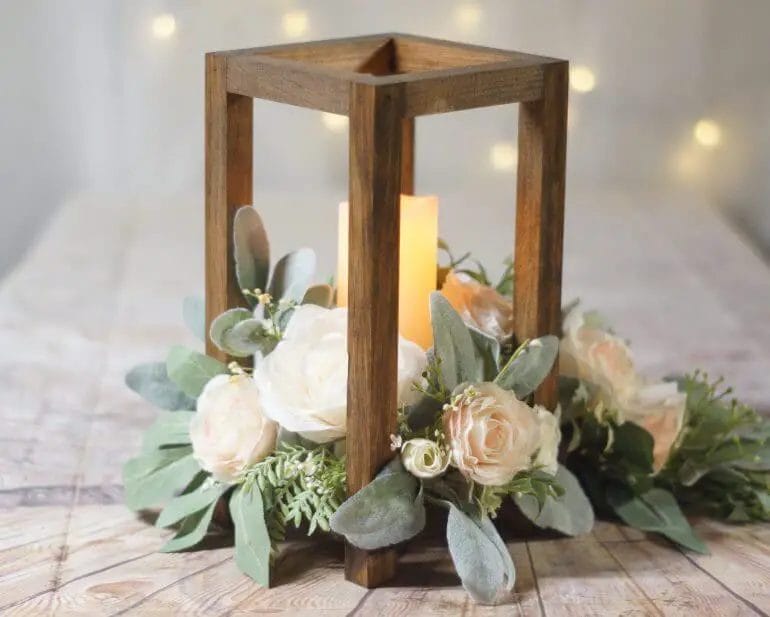
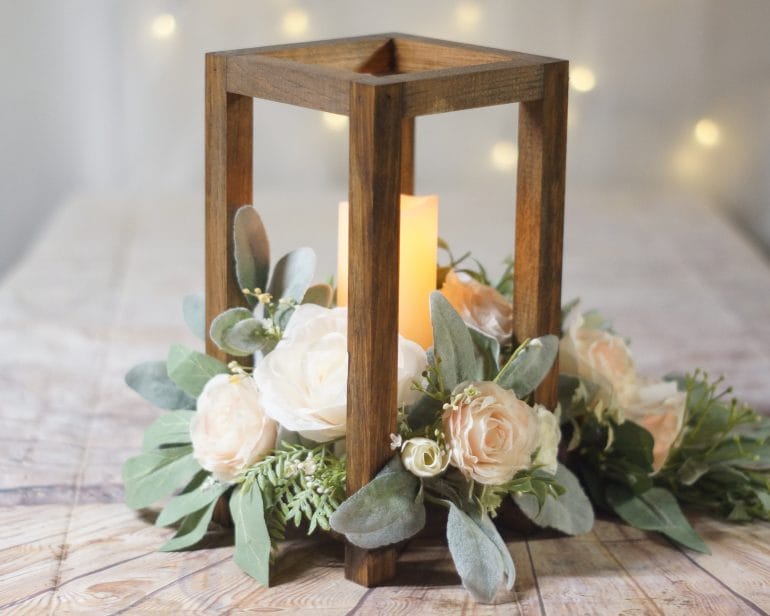
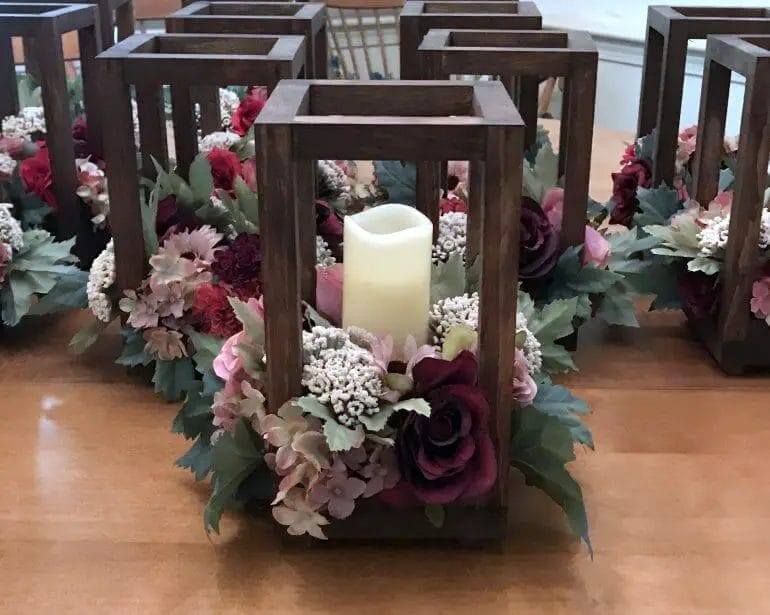
Embellishing with Natural Elements
Another way to personalize your wood lantern is by embellishing it with natural elements such as dried flowers, twigs, or pinecones. These organic materials add a touch of nature and can be easily swapped out with the changing seasons. For example, you can adorn your lantern with vibrant fall leaves during autumn or fresh flowers during the spring.
Creating a Custom Stand or Display
Lastly, consider creating a custom stand or display for your wood lantern. This allows you to showcase your design in a unique and eye-catching way. You can use a pedestal, a stack of books, or even a repurposed piece of furniture to elevate your lantern and make it a focal point in any room.
In summary, wood lanterns provide a wonderful opportunity to showcase your personal style and creativity. By selecting the right wood, adding engravings or carvings, painting or staining, incorporating decorative accents, using glass panels, embellishing with natural elements, and creating a custom stand or display, you can design a wood lantern that is truly unique and reflects your individuality. Let your imagination run wild and enjoy the process of creating a personalized wood lantern that will bring warmth and charm to your home.
5. Tips for Properly Finishing and Sealing Your Wood Lantern
When it comes to woodworking projects, properly finishing and sealing your wood lantern is essential for both its appearance and longevity. Finishing and sealing not only enhance the natural beauty of the wood but also protect it from moisture, stains, and other potential damages. In this section, we will provide you with some useful tips on how to properly finish and seal your wood lantern to ensure a professional and durable result.
1. Sanding and Smoothing
Before applying any finish or sealer, it is crucial to start with a smooth and even surface. Begin by sanding the entire surface of the wood lantern using progressively finer grits of sandpaper. Start with a coarse grit, such as 80 or 100, to remove any roughness or imperfections, and gradually work your way up to a finer grit, such as 220 or 320, to achieve a smooth finish. Be sure to sand in the direction of the wood grain to avoid any scratches or swirl marks.
2. Choosing the Right Finish
There are various options available when it comes to choosing the right finish for your wood lantern. Some popular choices include oil-based finishes, water-based finishes, and polyurethane. Each type of finish has its own advantages and disadvantages, so it is important to consider factors such as the desired level of protection, ease of application, and the overall look you want to achieve. Research different finishes and choose the one that best suits your needs.
3. Applying the Finish
Once you have chosen the appropriate finish, it is time to apply it to your wood lantern. Follow the instructions provided by the manufacturer for the best results. Generally, it is recommended to apply the finish using a brush, foam applicator, or a clean cloth. Start by applying a thin and even coat, working in the direction of the wood grain. Allow the first coat to dry completely before applying additional coats, if necessary. Sand lightly between coats to ensure a smooth and seamless finish.
4. Sealing the Wood
After applying the finish, it is crucial to seal the wood to protect it from moisture, humidity, and other external elements. There are several sealers available, such as wood sealer or clear varnish, that can provide an additional layer of protection. Apply the sealer using a brush or applicator, following the manufacturer’s instructions. Allow the sealer to dry completely before moving on to the next step.
5. Maintenance and Care
Proper maintenance and care are essential to keep your wood lantern in optimal condition. Avoid placing the lantern in direct sunlight or extreme temperatures, as this can cause the finish to fade or crack over time. Regularly dust and clean the lantern with a soft, dry cloth to remove any dirt or debris. If necessary, you can touch up the finish or reapply a new coat of sealer to maintain the appearance and protection of the wood.
In summary, properly finishing and sealing your wood lantern is crucial for its overall appearance and durability. By following these tips, you can achieve a professional-looking finish while protecting the wood from potential damages. Remember to sand and smooth the surface, choose the right finish, apply it correctly, seal the wood, and take proper care of the lantern to ensure its longevity. With these steps, your wood lantern will be a beautiful addition to your home or outdoor space.
Frequently Asked Questions
1. What materials do I need to make a wood lantern?
To make a wood lantern, you will need the following materials: a wooden frame, glass panels, hinges, screws, a handle, a saw, sandpaper, wood glue, and a stain or paint of your choice.
2. What tools do I need for making a wood lantern?
You will need a few tools for making a wood lantern, including a saw, screwdriver, sandpaper, wood glue, and a paintbrush or sponge for applying stain or paint. It may also be helpful to have clamps to hold the pieces together while the glue dries.
3. Can I customize the design of my wood lantern?
Yes, you can customize the design of your wood lantern to your liking. You can choose the shape and size of the frame, as well as the type of wood and finish you prefer. Remember to consider the practicality of the design and ensure it allows for easy access to the candle or light source inside.
Conclusion
In conclusion, learning how to make a wood lantern can be a rewarding and creative DIY project. By following the step-by-step instructions and using basic woodworking techniques, you can create a beautiful and functional lantern that adds warmth and ambiance to any space. Whether you’re a beginner or a seasoned woodworker, making a wood lantern allows you to showcase your craftsmanship and artistic skills. Additionally, by customizing the design and selecting different types of wood and finishes, you can create a lantern that perfectly suits your style and preferences. So, don’t hesitate to embark on this enjoyable and fulfilling woodworking project!
