Sola wood flowers are a popular choice for DIY enthusiasts and crafters. These eco-friendly and versatile flowers are made from the soft, lightweight bark of the sola plant, commonly found in Southeast Asia. Creating your own sola wood flowers is a fun and creative process that allows you to personalize your floral arrangements for various occasions. Whether you’re a beginner or an experienced crafter, learning how to make sola wood flowers is an enjoyable and rewarding endeavor. In this guide, we will explore the step-by-step process of creating stunning sola wood flowers from start to finish.

Step-by-Step Guide: A detailed walkthrough on how to make sola wood flowers from scratch
If you are someone who loves crafts and DIY projects, making sola wood flowers can be a fun and rewarding activity. Sola wood flowers are a popular choice for wedding decorations, home decor, and floral arrangements due to their natural and eco-friendly nature. In this step-by-step guide, we will walk you through the process of creating sola wood flowers from scratch.

Step 1: Gather your materials
Before you begin making sola wood flowers, you will need to gather the necessary materials. These include:
- Sola wood sheets
- Scissors
- Hot glue gun
- Floral wire
- Acrylic paint
- Paintbrushes
- Floral tape
- Optional: floral stem wrap
Step 2: Prepare the sola wood sheets
Start by cutting the sola wood sheets into strips. The width of the strips will determine the size of the petals, so consider the desired flower size when cutting them. Once you have the strips, cut them into petal shapes. You can experiment with different petal shapes to create various flower designs.
Step 3: Paint the petals
Next, it’s time to add color to your sola wood petals. Use acrylic paint and a paintbrush to apply your desired colors to the petals. You can go for a realistic flower look or get creative with vibrant and unique color combinations.
Step 4: Shape the petals
After the paint has dried, take each petal and gently curl the edges using your fingers. This will give the petals a natural and realistic appearance. You can also use a heat source, like a hairdryer, to slightly warm the petals and make them more pliable for shaping.
Step 5: Assemble the flowers
Now it’s time to assemble your sola wood flowers. Start by taking a floral wire and attaching it to the base of a petal using hot glue. Gradually add more petals around the wire, gluing them in place one by one. Continue adding petals until you achieve the desired fullness and shape for your flower. You can mix and match different petal shapes and sizes for more variety.
Step 6: Wrap the stems
If you want to create a more professional finish for your sola wood flowers, you can wrap the floral wire stems with floral tape or floral stem wrap. This will give your flowers a polished look and make them easier to handle and arrange in vases or bouquets.
Step 7: Finishing touches
Once your sola wood flowers are assembled and the stems are wrapped, you can add any additional embellishments you desire. This could include glitter, ribbons, or even preserved leaves. Get creative and customize your flowers to match your personal style and the occasion.
Summary
Making sola wood flowers from scratch can be a delightful and fulfilling craft project. With just a few materials and some creativity, you can create stunning and long-lasting floral arrangements for various purposes. Follow this step-by-step guide to bring your sola wood flower creations to life and enjoy the beauty of handmade flowers!
Tools and Materials
Creating beautiful sola wood flowers requires a few essential tools and materials. These items will help you achieve the desired results and make the process easier. Here is a list of the tools and materials you will need:1. Sola Wood Sheets
Sola wood sheets are the main material used for making sola wood flowers. These sheets are made from the bark of the sola plant, which is native to Southeast Asia. They are soft and lightweight, making them perfect for crafting delicate flowers. Sola wood sheets come in various thicknesses and can be easily cut and shaped into petals and other floral components.2. Cutting Tools
To cut the sola wood sheets into the desired shapes, you will need a sharp cutting tool. A precision knife or a pair of small scissors can be used for this purpose. Make sure to choose a tool that allows you to make precise cuts without damaging the wood.3. Hot Glue Gun
A hot glue gun is essential for assembling the sola wood flowers. It provides a strong bond and ensures that the petals and other components stay in place. Make sure to use a high-quality hot glue gun and glue sticks to ensure secure and long-lasting results.4. Floral Wire
Floral wire is used to create stems for the sola wood flowers. It provides support and makes it easier to arrange the flowers in bouquets or other floral arrangements. Choose a gauge of wire that is suitable for the size of the flowers you are making.5. Floral Tape
Floral tape is used to wrap the floral wire and create a natural-looking stem for the sola wood flowers. It also helps to secure any loose petals or components. Floral tape comes in various colors, so you can choose one that matches the color of your flowers.6. Paint and Brushes
To add color and detail to the sola wood flowers, you will need acrylic paint and a set of small brushes. Acrylic paint adheres well to the wood and allows you to create beautiful color gradients and patterns. Choose a variety of colors to bring your flowers to life.7. Floral Foam or Styrofoam
Floral foam or styrofoam is used as a base for arranging sola wood flowers in vases or other display containers. It provides stability and keeps the flowers in place. Make sure to choose the appropriate size and shape of floral foam or styrofoam for your arrangement.8. Optional Embellishments
If you want to add extra flair to your sola wood flowers, you can consider using embellishments such as glitter, beads, or ribbon. These additional materials can enhance the overall appearance of the flowers and make them even more eye-catching. By having these essential tools and materials on hand, you will be well-equipped to create beautiful sola wood flowers. With a little creativity and practice, you can make stunning floral arrangements that will last for years to come. So gather your supplies and let your imagination bloom!
Decorating Techniques: Explore different techniques for decorating and enhancing your sola wood flowers
When it comes to decorating and enhancing your sola wood flowers, the possibilities are endless. These versatile and eco-friendly flowers can be transformed into stunning masterpieces with the right techniques. Whether you’re planning a wedding, event, or simply want to add a touch of beauty to your home, here are some creative ways to decorate and enhance your sola wood flowers:
1. Painting
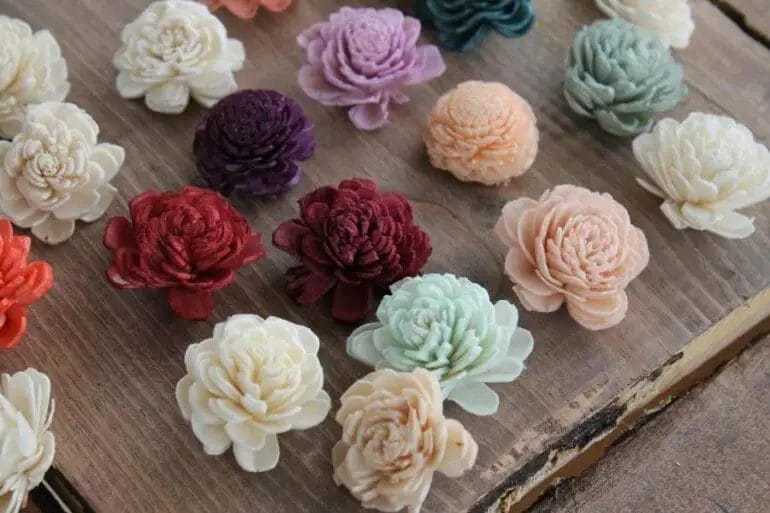
Painting is a popular technique for adding color and vibrancy to sola wood flowers. You can use acrylic or craft paint to achieve different effects. Whether you prefer a solid color or want to create a gradient or ombre effect, painting your sola wood flowers allows you to customize them to match any theme or color scheme. You can also experiment with different painting techniques such as brush strokes, stenciling, or even splattering to create unique and artistic designs.
2. Dyeing
If you want a more natural and subtle look, dyeing your sola wood flowers is a great option. You can use fabric dyes or even natural dyes like tea or coffee to achieve different shades. Dyeing gives the flowers a soft and organic look, perfect for rustic or boho-themed decor. You can also experiment with different dyeing techniques like dip-dyeing, tie-dyeing, or even ombré dyeing to create beautiful gradients and patterns.
3. Embellishments
Adding embellishments to your sola wood flowers can take them to the next level. You can use various materials like ribbons, rhinestones, pearls, or feathers to add texture and sparkle to the flowers. Embellishments can be attached to the center of the flowers or scattered throughout the arrangement for a more whimsical look. The possibilities are endless, so let your creativity shine and create unique and eye-catching designs.
4. Scenting
Another way to enhance your sola wood flowers is by adding fragrance. You can use essential oils or floral scents to give the flowers a pleasant aroma. Simply apply a few drops of the scent of your choice to the flowers and let them absorb the fragrance. This not only adds a lovely scent to your arrangement but also creates a more realistic and immersive experience.
5. Arranging
The way you arrange your sola wood flowers can make a big difference in their overall look. You can create beautiful bouquets, centerpieces, or even floral backdrops by arranging the flowers in different ways. Experiment with different sizes, shapes, and colors to create visually appealing arrangements. You can also mix sola wood flowers with fresh or dried flowers for a more unique and dynamic look.
6. Floral Wreaths
Sola wood flowers are perfect for creating stunning floral wreaths. You can use a variety of flower sizes and colors to create a visually appealing wreath for any occasion. Whether you prefer a minimalist design or a more elaborate and whimsical look, sola wood flowers can be easily arranged and attached to a wreath base. Add a ribbon or bow for a finishing touch.
7. Floral Crowns
For a boho or romantic touch, consider making floral crowns with sola wood flowers. These crowns are perfect for weddings, festivals, or even as a statement accessory. Simply attach the flowers to a flexible base like a wire or headband, and you’ll have a stunning floral crown that will surely turn heads.
In summary, decorating and enhancing your sola wood flowers is a fun and creative process. Whether you choose to paint, dye, embellish, scent, arrange, or create wreaths and crowns, these techniques will transform your sola wood flowers into beautiful and unique pieces of art. So let your imagination run wild and enjoy the process of turning simple sola wood flowers into stunning decorations.
DIY Sola Wood Flower Arrangements
Sola wood flowers have gained popularity in recent years as a sustainable and long-lasting alternative to traditional flowers. Made from the tapioca plant, these flowers are not only eco-friendly but also incredibly versatile when it comes to crafting beautiful arrangements. Whether you’re planning a wedding, a special event, or simply want to add some floral decor to your home, here are some useful tips and ideas for creating stunning flower arrangements using sola wood flowers.
1. Choose the Right Flowers
When it comes to selecting sola wood flowers for your arrangement, you have a wide range of options. From roses and peonies to sunflowers and daisies, there is a sola wood flower to suit every style and theme. Consider the color palette you want to work with and choose flowers that complement each other. Mixing different flower types and sizes will add depth and visual interest to your arrangement.
2. Prepare the Flowers
Before you start arranging your sola wood flowers, it’s important to prepare them properly. Gentle fluffing and shaping will bring the flowers to life and make them look more realistic. Gently separate the petals, twist and bend the stems, and remove any excess glue. This step will ensure that your flowers appear natural and well-groomed.
3. Plan the Design
Having a clear vision of the arrangement you want to create will help you stay organized and achieve the desired result. Consider the size and shape of the container you’ll be using and envision how the flowers will fit into it. Start by placing the focal flowers in the center and then work your way outwards, adding filler flowers and greenery to create a balanced and harmonious composition.
4. Get Creative with Color
One of the advantages of working with sola wood flowers is that you can easily customize their color to match your decor or theme. Consider dyeing the flowers using fabric dye or acrylic paint to achieve the desired shades. Experiment with different color combinations and gradients to create unique and eye-catching arrangements that will wow your guests.
5. Incorporate Natural Elements
To enhance the natural beauty of sola wood flowers, consider incorporating other elements from nature into your arrangements. Add dried branches, twigs, or pinecones for a rustic touch. Incorporating fresh or dried foliage, such as eucalyptus or ferns, will add texture and depth to your arrangement. These natural elements will complement the sola wood flowers and create a cohesive and organic look.
6. Play with Height and Proportions
Creating an arrangement with varying heights and proportions will add visual interest to your display. Use floral foam or a grid to secure the stems in place and experiment with different heights to achieve a dynamic and balanced composition. Taller flowers in the center and cascading blooms on the sides can create a visually appealing arrangement that draws the eye.
7. Add Personal Touches
Add a personal touch to your sola wood flower arrangements by incorporating sentimental items or meaningful accents. Attach small charms or trinkets to the stems or weave a ribbon with a special message into the arrangement. These personal touches will make your arrangement even more special and unique.
8. Care and Maintenance
To ensure that your sola wood flower arrangements last for a long time, it’s important to provide proper care and maintenance. Keep the flowers away from direct sunlight and excessive moisture to prevent fading and damage. Dust the flowers regularly with a soft brush or use compressed air to clean them. With the right care, your sola wood flower arrangements will continue to bring beauty and joy for years to come.
In summary, creating stunning flower arrangements using sola wood flowers is a fun and creative DIY project that allows you to showcase your personal style and add a touch of natural beauty to any space. With the right flowers, preparation, design, and personal touches, you can create arrangements that are not only visually striking but also eco-friendly and long-lasting.
FAQs
1. How can I make sola wood flowers?
To make sola wood flowers, you will need sola wood sheets, floral wire, a hot glue gun, and paint or dye. Cut the sola wood sheets into desired petal shapes, stack them, and secure with floral wire. Use hot glue to attach the petals to the wire and shape them. Finally, paint or dye the flowers to your desired color.
2. Where can I buy sola wood sheets for making flowers?
You can buy sola wood sheets online from various craft stores or suppliers. Look for reputable sellers that offer a range of thicknesses and sizes to suit your flower-making needs. Some popular online retailers for sola wood sheets include Amazon, Etsy, and specialized craft websites.
3. Can sola wood flowers be scented?
Yes, sola wood flowers can be scented using essential oils or fragrance oils. Simply add a few drops of your preferred scent to a spray bottle filled with water, mist the flowers from a distance, and allow them to dry. Alternatively, you can soak the flowers in scented oil for a more intense fragrance.
Conclusion
In conclusion, making sola wood flowers is a creative and enjoyable craft that allows you to unleash your artistic side. By following the step-by-step process of dyeing, shaping, and assembling the flowers, you can create stunning and long-lasting floral arrangements for various occasions.
The versatility of sola wood flowers makes them a popular choice for weddings, home decor, and gift-giving. With their realistic appearance and ability to be easily customized, these flowers offer a unique and eco-friendly alternative to traditional fresh blooms.
Whether you are a DIY enthusiast or a professional florist, incorporating sola wood flowers into your floral creations will surely make them stand out. So, grab your materials and get ready to immerse yourself in the wonderful world of sola wood flower making!
