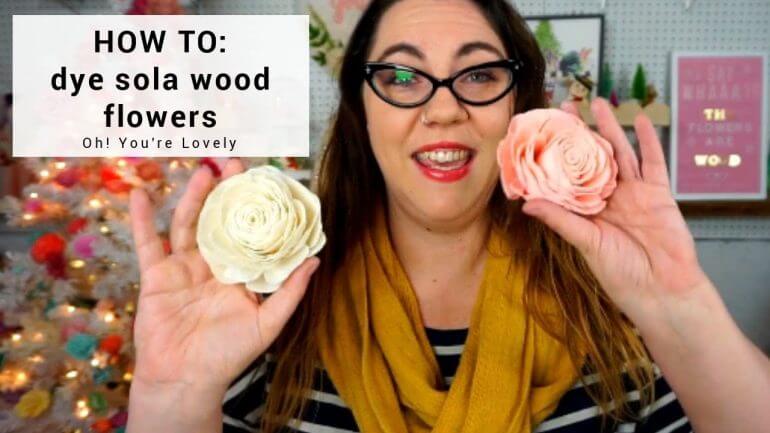
Looking to add a vibrant touch to your wooden creations? Learn how to dye wood flowers and unleash your creativity! Dyeing wood flowers is a simple and fun process that allows you to infuse a splash of color into your crafting projects. Whether you want to create stunning floral arrangements or unique decorations, dyeing wood flowers opens up a world of possibilities. Discover the step-by-step techniques, tips, and tricks to achieve beautiful, eye-catching results that will surely impress.
Preparing the Wood Surface for Dyeing
Before dyeing wood, it is essential to prepare the surface properly to ensure that the dye adheres evenly and produces the desired results. In this section, we will discuss the steps involved in preparing the wood surface for dyeing.

Clean the Wood
The first step in preparing the wood surface is to clean it thoroughly. Use a clean cloth or sponge to remove any dust, dirt, or debris from the wood. You can also use a vacuum cleaner with a brush attachment to remove loose particles.
Sand the Surface
Next, you need to sand the wood surface to create a smooth and even texture. Start with a coarse-grit sandpaper (around 80-100 grit) to remove any rough spots or imperfections. Sand in the direction of the wood grain to avoid scratching the surface.
After sanding with the coarse-grit sandpaper, switch to a finer-grit sandpaper (around 120-150 grit) to further smooth the surface. Sanding with finer grits will help the dye penetrate evenly into the wood fibers.
Remove Sanding Dust
After sanding, it is crucial to remove all the sanding dust from the surface. Use a tack cloth or a soft, lint-free cloth to wipe away the dust. Make sure to clean all the nooks and crannies to ensure a clean surface for dye application.
Apply a Wood Conditioner
Depending on the type of wood you are working with, it may be necessary to apply a wood conditioner before dyeing. Wood conditioners help to even out the color absorption and prevent blotching. Follow the manufacturer’s instructions to apply the wood conditioner evenly on the surface.
Test the Dye
Before applying the dye to the entire wood surface, it is always a good idea to test it on a small, inconspicuous area. This will allow you to assess the color and make any necessary adjustments before proceeding with the dyeing process.
Apply the Dye
Once you have completed all the preparatory steps, it’s time to apply the dye. Use a clean cloth, sponge, or brush to apply the dye evenly onto the wood surface. Work in small sections, ensuring that the dye is spread uniformly.
Allow the dye to penetrate the wood according to the manufacturer’s instructions. This could range from a few minutes to several hours, depending on the type of dye used. Always refer to the product label for specific guidelines.
Remove Excess Dye
After the recommended dyeing time has elapsed, remove any excess dye from the surface. Use a clean cloth or sponge to wipe away the excess dye gently. Be careful not to disturb the dye that has already penetrated the wood.
Seal the Wood
Finally, after the dye has dried, it is essential to seal the wood to protect the color and enhance its durability. Apply a clear wood sealer or finish using a brush or cloth, following the manufacturer’s instructions. Allow the sealer to dry completely before using or handling the wood.
In summary, preparing the wood surface for dyeing involves cleaning, sanding, removing dust, applying a wood conditioner, testing the dye, applying the dye, removing excess dye, and sealing the wood. By following these steps, you can ensure that your wood dyeing project achieves the desired results and the wood surface looks beautiful and professional.
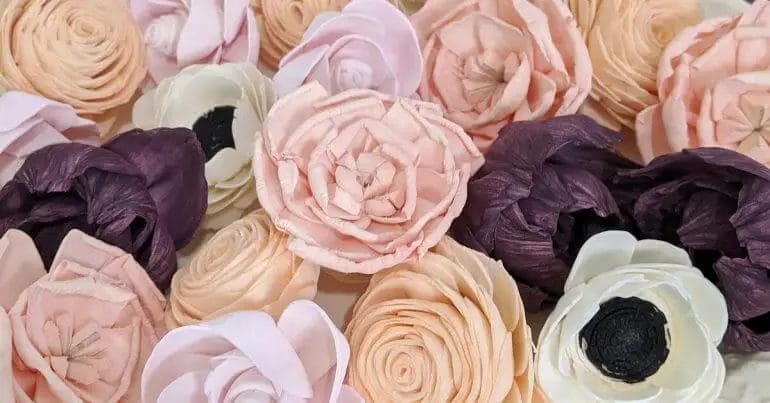
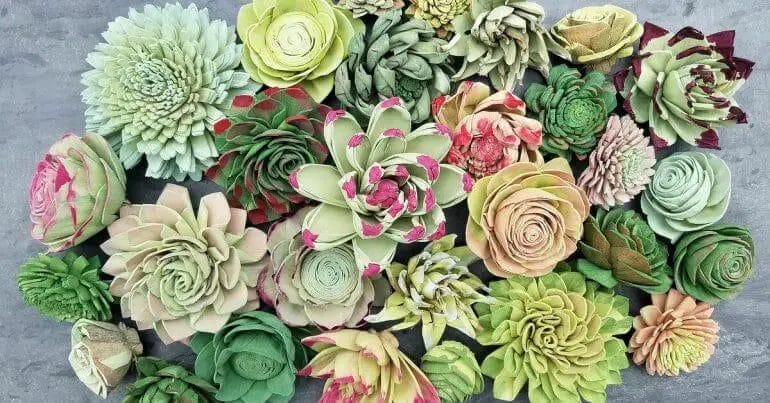
Different Techniques for Dyeing Wood Flowers
Wood flowers have become a popular choice for various crafts and decorations due to their beautiful and long-lasting nature. These flowers are made from wood shavings and can be dyed in a variety of colors to match any theme or style. In this section, we will explore different techniques for dyeing wood flowers, allowing you to create unique and vibrant pieces for your projects.
1. Dip Dyeing
Dip dyeing is a simple and effective technique that involves submerging the wood flowers into a dye solution. This method allows for a quick and even coverage of color. To dip-dye wood flowers, start by preparing your dye solution by mixing fabric dye with water according to the manufacturer’s instructions. Then, dip the flowers into the solution, making sure to fully immerse them. Leave them in the dye for a few seconds to a minute, depending on the desired intensity of color. Once the flowers are dyed, remove them from the solution and let them dry completely.
2. Brush-on Dye
Brush-on dyeing is a more controlled technique that allows for precise application of color. This method is ideal for creating intricate designs or adding highlights to wood flowers. To brush on dye, use a small brush and dip it into the dye solution. Gently brush the dye onto the petals of the wood flowers, making sure to cover the desired areas. You can vary the intensity of the color by applying multiple layers of dye. Allow the flowers to dry between each layer to avoid smudging or mixing of colors.
3. Spraying
Spraying is another popular technique for dyeing wood flowers, as it provides a fine and even distribution of color. This method is best suited for larger batches of flowers or when you want to achieve a gradient effect. To spray dye onto wood flowers, fill a spray bottle with the dye solution and adjust the nozzle to a fine mist setting. Hold the spray bottle at a distance from the flowers and lightly mist the petals, ensuring that the dye is evenly distributed. Allow the flowers to dry completely before handling them.
4. Ombre Dyeing
Ombre dyeing is a technique that creates a beautiful gradient effect on wood flowers. This method requires a gradual transition of color from light to dark or vice versa. To achieve an ombre effect, prepare multiple containers of dye solution with varying intensities. Start by dipping the flowers into the lightest dye solution and gradually move them into containers with darker shades. Keep the flowers immersed in each container for a few seconds to allow the dye to penetrate the petals. Finally, remove the flowers from the last container and let them dry completely.
5. Staining
In addition to dyeing, you can also consider staining wood flowers for a more natural and rustic look. Staining involves using wood stain instead of dye to color the flowers. Apply the wood stain to the flowers using a brush or sponge, ensuring that the stain is evenly distributed. Allow the stain to penetrate the wood and then wipe off any excess stain using a clean cloth. Let the flowers dry completely before handling them.
By using these different techniques for dyeing wood flowers, you can create stunning and colorful pieces for various occasions and projects. Experiment with different colors and combinations to achieve the desired effects. Whether you prefer a vibrant and bold look or a subtle and natural appearance, the versatility of wood flowers allows you to bring your creative vision to life.
Tips and Tricks for Achieving Desired Results
When it comes to achieving your desired results, it’s important to have a clear plan and the right strategies in place. In this section, we will explore some helpful tips and tricks that can help you reach your goals effectively. Whether you are looking to improve your personal life, career, or health, these tips will provide you with actionable steps to get started.
1. Set Clear Goals
The first step in achieving your desired results is to set clear and specific goals. Having a clear vision of what you want to achieve will help you stay focused and motivated. Make sure your goals are realistic, measurable, and time-bound. Write them down and keep them visible as a constant reminder of what you are working towards.
2. Create a Plan
Once you have defined your goals, it’s important to create a detailed plan to help you achieve them. Break down your goals into smaller, manageable tasks and create a timeline for each task. This will help you stay organized and track your progress. Make sure to allocate enough time and resources to each task to ensure successful completion.
3. Take Action
No matter how well you plan, nothing will happen unless you take action. It’s important to take consistent and deliberate action towards your goals. This may involve stepping out of your comfort zone, facing challenges, and making sacrifices. Remember that small steps taken consistently will lead to larger results over time.
4. Stay Motivated
Staying motivated throughout your journey is crucial for achieving your desired results. Find ways to keep yourself motivated, such as visualizing your success, celebrating small victories, and surrounding yourself with supportive and like-minded individuals. Remember why you started in the first place and keep your eye on the prize.
5. Learn from Failure
Failure is an inevitable part of any journey towards success. Instead of letting failure discourage you, use it as an opportunity to learn and grow. Analyze what went wrong, identify areas for improvement, and adjust your approach accordingly. See failure as a stepping stone towards success rather than a roadblock.
6. Seek Guidance and Support
Seeking guidance and support from others can greatly enhance your chances of achieving your desired results. Surround yourself with mentors, coaches, or like-minded individuals who can provide valuable insights, advice, and support. Learning from those who have already achieved what you are striving for can help you avoid common pitfalls and accelerate your progress.
7. Stay Consistent and Patient
Consistency and patience are key when it comes to achieving your desired results. Rome wasn’t built in a day, and neither will your goals be accomplished overnight. Stay committed to your plan, even when progress seems slow or obstacles arise. Trust the process and have faith that your consistent efforts will eventually yield the desired outcome.
8. Celebrate Your Achievements
As you work towards your goals, it’s important to celebrate your achievements along the way. Acknowledge and reward yourself for the progress you have made. This will not only boost your motivation but also reinforce positive habits and behaviors that will support your continued success.
By following these tips and tricks, you can increase your chances of achieving your desired results. Remember that success is a journey, and it requires dedication, perseverance, and a willingness to learn and adapt. Stay focused, stay motivated, and keep pushing forward towards your goals.
Sealing and Protecting Dyed Wood Flowers
If you have recently dyed your wood flowers and want to ensure that they maintain their vibrant colors for a long time, it is essential to seal and protect them properly. Sealing not only enhances the appearance of the flowers but also helps to prevent fading, chipping, and discoloration over time. In this section, we will discuss the steps involved in sealing and protecting dyed wood flowers.
1. Choose the Right Sealer
Before you begin sealing your dyed wood flowers, it is crucial to choose the right sealer for the job. There are several options available, including spray sealers, brush-on sealers, and epoxy resin. Consider the type of wood flowers you have and the finish you desire when selecting a sealer. Spray sealers are ideal for achieving an even and smooth finish, while brush-on sealers allow for more control over the application process. Epoxy resin provides a glossy and durable finish, perfect for protecting delicate flowers.
2. Prepare the Flowers
Prior to sealing, ensure that your dyed wood flowers are clean and free from any dust or debris. Gently wipe them with a soft cloth or use a mild detergent to remove any dirt or stains. Allow the flowers to dry completely before moving on to the next step.
3. Apply the Sealer
When applying the sealer, it is essential to follow the manufacturer’s instructions carefully. Whether you are using a spray sealer or a brush-on sealer, make sure to apply an even coat to the entire surface of the wood flowers. Start with a thin layer and allow it to dry before applying additional coats for a more durable finish. Take care to cover all the nooks and crevices to ensure complete protection.
4. Let it Dry
After applying the sealer, allow the wood flowers to dry completely. The drying time may vary depending on the type of sealer used and the environmental conditions. It is best to leave the flowers undisturbed for at least 24 hours to ensure that the sealer has fully cured.
5. Optional: Sand and Polish
If you desire a smoother and more polished finish, you can sand the sealed wood flowers lightly. Use a fine-grit sandpaper to gently remove any imperfections or rough edges. After sanding, wipe away any dust and apply a final coat of sealer to protect the newly smoothed surface.
6. Display and Enjoy
Once the sealer has dried and any optional finishing touches have been made, your dyed wood flowers are ready to be displayed and enjoyed. Arrange them in a vase or create stunning floral arrangements that will continue to brighten up any space for years to come.
In summary, sealing and protecting your dyed wood flowers is an important step in maintaining their beauty and ensuring their longevity. By choosing the right sealer, preparing the flowers properly, and applying the sealer evenly, you can effectively guard against fading and damage. Don’t forget to let the sealer dry completely before handling the flowers, and consider sanding and polishing for a smoother finish. With the right care, your dyed wood flowers will be a vibrant and long-lasting addition to your decor.
FAQs
1. How do I dye wood flowers?
To dye wood flowers, you can use water-based or alcohol-based dyes. First, prepare the dye solution according to the instructions. Then, either dip the flowers into the dye or use a paintbrush to apply the dye evenly. Allow the flowers to dry completely before handling or arranging them.
2. Can I use regular fabric dye to dye wood flowers?
No, regular fabric dye is not recommended for dyeing wood flowers. Fabric dye is designed specifically for use on textiles and may not adhere well to wood surfaces. It’s best to use dyes specifically formulated for wood or natural materials.
3. How long does it take for the dye to dry on wood flowers?
The drying time for dye on wood flowers can vary depending on the type of dye used and environmental conditions. Generally, it can take a few hours to overnight for the dye to fully dry. It’s important to allow sufficient drying time to prevent smudging or transferring of the dye.
Conclusion
In conclusion, dying wood flowers is a fun and creative way to add a pop of color to your home decor or special events. Whether you are a DIY enthusiast or a professional crafter, the process is simple and can yield stunning results. By using different dyeing techniques such as dip-dyeing or brush application, you can achieve a variety of vibrant and unique effects. Remember to choose high-quality wood flowers to ensure they absorb the dye evenly and maintain their shape. Experiment with different color combinations and techniques to create personalized and eye-catching arrangements. So, unleash your creativity and enjoy the art of dyeing wood flowers!
Not only does dyeing wood flowers offer a sustainable and long-lasting alternative to traditional floral arrangements, but it also allows you to customize and match any color scheme or theme. Whether you want to create a rustic, bohemian vibe or a modern and sleek look, dyeing wood flowers can help you achieve your desired aesthetic. Additionally, the versatility of wood flowers allows you to use them in various settings, including weddings, parties, or as home decor accents. So, let your imagination run wild and transform ordinary wood flowers into extraordinary pieces of art with the magic of dye!
