Painting dark wood white can be a transformative and refreshing project that can brighten up any space. With the right tools and techniques, you can achieve a clean and professional finish. First, prep the surface by thoroughly cleaning and sanding the wood. Apply a primer to create a smooth base that will help the paint adhere better. Then, choose a high-quality white paint that is specifically formulated for wood. Apply multiple thin coats, allowing each coat to dry before applying the next. Finally, seal the surface with a clear topcoat for added durability and protection.
Preparing the Dark Wood for Painting: Sanding and Priming
When it comes to painting dark wood, proper preparation is key. Sanding and priming the surface before applying paint will ensure a smooth and long-lasting finish. In this section, we will discuss the steps involved in sanding and priming dark wood to achieve the best results.

Sanding the Dark Wood
The first step in preparing dark wood for painting is sanding. Sanding helps to remove any existing finish, smooth out imperfections, and create a suitable surface for the paint to adhere to. Follow these steps for sanding dark wood:
- Start by gathering the necessary materials, including sandpaper with varying grits (coarse, medium, and fine), a sanding block or sanding sponge, and a dust mask.
- Begin by using the coarse-grit sandpaper to remove the existing finish. Sand in the direction of the wood grain to avoid damaging the surface.
- Once the existing finish is removed, switch to the medium-grit sandpaper to smooth out any rough areas or imperfections. Again, sand in the direction of the wood grain.
- Finish the sanding process by using the fine-grit sandpaper to create a smooth and even surface. Remove any dust or debris using a clean cloth.
Priming the Dark Wood
After sanding the dark wood, the next step is to apply a primer. Priming is essential as it helps the paint adhere better to the surface, provides a consistent base color, and prevents the wood from absorbing too much paint. Follow these steps for priming dark wood:
- Choose a suitable primer for your project. Look for a primer specifically designed for dark or stained wood.
- Ensure the surface is clean and free from any dust or debris. Use a damp cloth to wipe down the wood and remove any remaining sanding residue.
- Using a brush or roller, apply an even coat of primer to the dark wood. Work in small sections, following the direction of the wood grain.
- Allow the primer to dry completely according to the manufacturer’s instructions. This usually takes a few hours.
- Inspect the primed surface for any imperfections or uneven areas. If necessary, lightly sand the primed surface with fine-grit sandpaper and remove any dust before proceeding.
In summary, sanding and priming are crucial steps in preparing dark wood for painting. Sanding helps to create a smooth surface, while priming ensures proper adhesion and a consistent base color. By following these steps, you can achieve professional-looking results when painting dark wood.
Step-by-Step Guide to Painting Dark Wood White
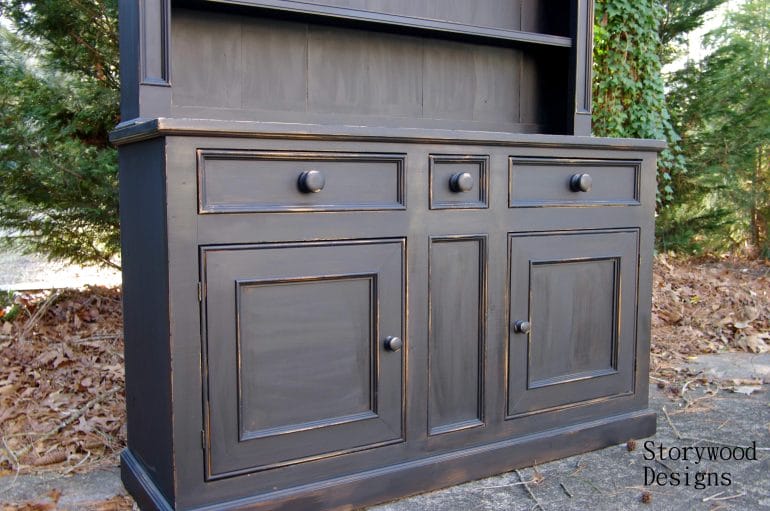
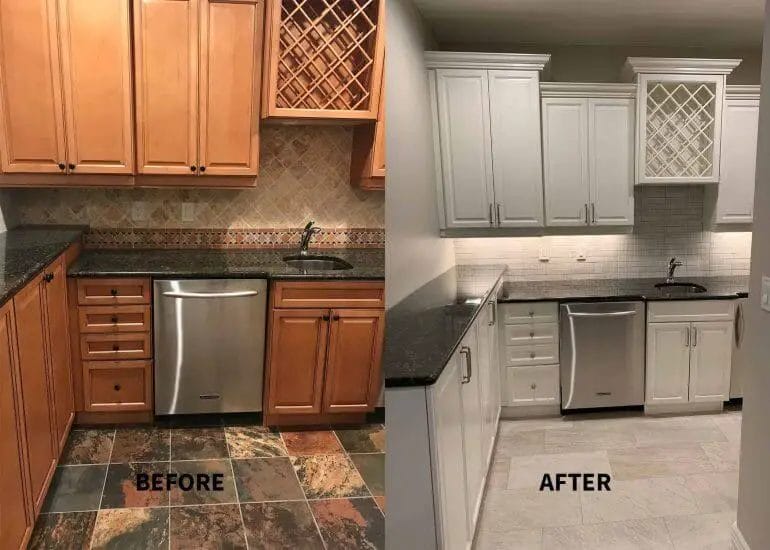
Painting dark wood white can completely transform the look of furniture, cabinets, or any other wooden surfaces. Whether you want to update your old furniture or give a fresh makeover to your kitchen cabinets, painting dark wood white is a cost-effective and easy way to achieve a lighter and brighter aesthetic. In this step-by-step guide, we will walk you through the process of painting dark wood white, from preparing the surface to applying the final coat.
Materials You Will Need:
- Primer
- Paint (white latex or oil-based paint)
- Paintbrush or roller
- Sandpaper (medium and fine grit)
- Painter’s tape
- Drop cloth or newspaper
- Clean cloth
- Paint tray
- Paint stirrer
- Paint thinner (if using oil-based paint)
Step 1: Prepare the Surface
The first step in painting dark wood white is to prepare the surface. Start by removing any hardware or accessories from the furniture or cabinets. Next, use sandpaper to lightly sand the surface of the wood. This will help the primer and paint adhere better. Use a clean cloth to wipe away any dust or debris.
Step 2: Apply Primer
Before painting, it is recommended to apply a coat of primer. Primer helps to cover any stains or dark spots on the wood and create a smooth and even surface for the paint. Use a paintbrush or roller to apply the primer evenly, following the wood grain. Allow the primer to dry completely before moving on to the next step.
Step 3: Choose the Right Paint
When painting dark wood white, it is important to choose the right type of paint. You can opt for either white latex paint or oil-based paint. Latex paint is water-based, quick-drying, and easy to clean up, making it a popular choice for DIY projects. Oil-based paint, on the other hand, provides a more durable and smoother finish, but it has a longer drying time and requires paint thinner for cleanup.
Step 4: Apply the White Paint
Once the primer is dry, it’s time to apply the white paint. Stir the paint thoroughly to ensure an even consistency. Use a paintbrush or roller to apply the paint, following the wood grain. Apply thin and even coats, allowing each coat to dry fully before applying the next one. This will help you achieve a smooth and professional-looking finish.
Step 5: Sand and Repeat
If necessary, lightly sand the surface between coats of paint using fine-grit sandpaper. This will help remove any imperfections and create a smooth finish. After sanding, wipe away any dust with a clean cloth before applying the next coat of paint. Repeat this step until you achieve the desired level of coverage and whiteness.
Step 6: Finishing Touches
Once you are satisfied with the painted surface, allow the final coat of paint to dry completely. If needed, you can add a clear topcoat to protect the paint and enhance the durability of the finish. Finally, reattach any hardware or accessories that were removed and enjoy your newly painted white wood!
In summary, painting dark wood white can be a simple and rewarding DIY project. By following these step-by-step instructions and using the right materials, you can easily transform dark wood into a bright and fresh-looking surface. Whether you’re updating furniture or revamping your kitchen cabinets, painting dark wood white is an effective way to achieve a modern and stylish aesthetic.
Adding a Protective Finish for Long-lasting Results
Once you have completed your project and achieved the desired look, it is crucial to add a protective finish to ensure the longevity of your work. A protective finish not only enhances the appearance but also provides a barrier against wear and tear, moisture, and other damaging factors.
There are several types of protective finishes available, each with its own characteristics and application methods. Choosing the right finish depends on the type of project, the desired level of protection, and personal preference. Let’s explore some popular options:
1. Varnish
Varnish is a versatile and durable protective finish that is commonly used on wood surfaces. It creates a hard, clear coating that enhances the natural beauty of the wood while offering excellent protection against scratches, stains, and UV damage. Varnish is available in various sheens, including matte, satin, semi-gloss, and high gloss.
To apply varnish, you will need a brush or a sprayer. It is essential to follow the manufacturer’s instructions regarding the number of coats and drying times. Sanding between coats can help achieve a smooth and flawless finish.
2. Polyurethane
Polyurethane is another popular choice for protecting wooden surfaces. It is available in both oil-based and water-based formulas. Oil-based polyurethane provides a rich, amber tone, while water-based polyurethane dries clear and does not yellow over time.
Polyurethane offers excellent durability and resistance to scratches, chemicals, and water. It is typically applied with a brush or a foam applicator, and multiple coats are recommended for optimal protection. Use smooth, even strokes to avoid brush marks or bubbles.
3. Lacquer
Lacquer is a fast-drying finish that provides a beautiful, glossy appearance. It is commonly used on furniture, cabinets, and musical instruments. Lacquer is available in spray cans, making it easy to apply and achieve an even finish.
When applying lacquer, it is crucial to work in a well-ventilated area due to the strong fumes. Multiple thin coats are recommended for the best results. Sanding between coats can help achieve a smooth finish.
4. Shellac
Shellac is a natural finish that comes from the resin secreted by the lac bug. It provides a warm, traditional look and is often used on antique furniture. Shellac is available in both liquid and pre-mixed form, and it dries quickly.
Applying shellac requires a brush or a soft cloth. Multiple coats are typically applied to build up the desired level of protection. It is important to note that shellac is not as durable as some other finishes and may require occasional maintenance.
5. Wax
Wax is a traditional and easy-to-apply finish that provides a soft, low-gloss sheen. It is commonly used on furniture, wooden bowls, and decorative items. Wax enhances the natural beauty of the wood while offering some protection against moisture and minor scratches.
To apply wax, you will need a clean cloth or a wax brush. Rub the wax onto the surface in a circular motion and let it dry. Buff the dried wax with a soft cloth to achieve a smooth and lustrous finish.
6. Epoxy
Epoxy is a durable and versatile finish that provides a high-gloss, glass-like appearance. It is commonly used on countertops, tabletops, and floors. Epoxy offers excellent resistance to chemicals, heat, and water.
Applying epoxy requires careful preparation and mixing of the two components. It is typically poured onto the surface and spread evenly using a squeegee or a roller. Multiple coats may be necessary to achieve the desired thickness and durability.
Before applying any protective finish, it is important to ensure that the surface is clean, dry, and free of any dust or debris. Sanding the surface lightly can help the finish adhere better. Always follow the manufacturer’s instructions for the specific product you are using.
In summary, adding a protective finish to your project is essential for long-lasting results. Whether you choose varnish, polyurethane, lacquer, shellac, wax, or epoxy, each finish offers its own unique benefits and protective properties. By selecting the right finish and applying it properly, you can enhance the visual appeal of your project while ensuring its durability and longevity.
5. Tips and Tricks for a Professional-looking White Painted Finish
When it comes to giving your space a fresh and elegant look, a white painted finish can work wonders. However, achieving a professional-looking result requires some skill and attention to detail. Here are some tips and tricks to help you achieve that flawless white painted finish:
1. Select the Right White
Believe it or not, there are numerous shades of white to choose from, and not all whites are created equal. To achieve a professional look, carefully consider the undertones and choose a white that complements your space. Whether you prefer a warm or cool white, take the time to test different shades before committing to one.
2. Prepare the Surface
Achieving a flawless paint finish starts with proper surface preparation. Make sure to clean the surface thoroughly, removing any dirt, dust, or grease. Sand any rough areas and fill in any holes or cracks with a suitable filler. Smooth out the surface by sanding it gently, ensuring an even and smooth canvas for the paint.
3. Prime the Surface
Priming the surface is essential, especially when painting over a darker color or bare wood. A quality primer will create a smooth base and enhance the adherence and durability of the topcoat. Use a white primer specifically designed for the surface you are working on, whether it’s wood, metal, or drywall.
4. Use High-Quality Tools and Brushes
The quality of your tools and brushes can make a significant difference in the final result. Invest in high-quality brushes with synthetic bristles for a smooth and even application. Avoid using cheap, low-quality brushes that can leave visible brushstrokes or shed bristles. Quality tools and brushes will give you more control and help achieve a professional finish.
5. Apply Thin and Even Coats
When applying paint, it’s better to start with thin and even coats rather than applying a thick layer all at once. This will help prevent drips, brush marks, and uneven drying. Allow each coat to dry completely before applying the next one. Multiple thin layers will result in a smoother and more professional finish.
6. Use Proper Painting Techniques
Learning and using proper painting techniques can make a significant difference in the final outcome. To avoid visible brush or roller marks, paint in smooth, consistent strokes. Feather the edges of each stroke to blend them seamlessly. If using a roller, use a high-quality roller cover to achieve a smooth and even texture.
7. Pay Attention to Lighting
Lighting plays a crucial role in how the white paint appears in your space. Consider the natural and artificial lighting in the room when selecting your white shade. Test the paint color in different lighting conditions to ensure it looks as desired. This will help you achieve the desired professional look in any lighting situation.
8. Take your Time and Be Patient
Achieving a professional-looking white painted finish takes time and patience. Rushing through the process can result in mistakes and an uneven finish. Take your time to apply each coat carefully, allowing proper drying time between coats. Patience and attention to detail will pay off in the end.
9. Practice on a Sample Board
If you’re unsure about your technique or want to test different white shades, practice on a sample board before tackling the entire room. This will allow you to experiment, refine your technique, and ensure you’re happy with the result before committing to painting the entire space.
10. Final Touches and Clean-Up
Once you’ve achieved your desired professional white painted finish, take the time to inspect the space and make any necessary touch-ups. Remove any painter’s tape carefully, and clean up any paint spills or splatters. A clean and well-finished space will truly showcase your professional-looking white paint job.
By following these tips and tricks, you can achieve a flawless and professional-looking white painted finish that will transform your space into an elegant and timeless haven.
FAQs
Q: How to paint dark wood white?
To paint dark wood white, follow these steps: 1) Clean the surface thoroughly; 2) Sand the wood to create a smooth base; 3) Apply a primer specifically designed for wood surfaces; 4) Once the primer is dry, apply multiple coats of white paint, allowing each coat to dry before applying the next; 5) Finish with a protective topcoat.
Q: What type of paint should I use to paint dark wood white?
For painting dark wood white, it is recommended to use a high-quality latex or acrylic paint that provides good coverage. Satin or semi-gloss finishes are commonly used for a smooth and durable white finish.
Q: Do I need to sand the dark wood before painting it white?
Yes, sanding the dark wood is an important step to ensure proper adhesion and a smooth white finish. Use sandpaper with a medium grit to remove any existing finish or roughen the surface, then finish with a finer grit for a smoother result.
Conclusion:
In conclusion, transforming dark wood into a bright white is a desired aesthetic that can completely revitalize a space. By following the proper steps and using the right materials, you can achieve a professional-looking result. Remember to prepare the surface by cleaning, sanding, and priming it before applying the white paint. Multiple thin coats will provide a smooth and even finish. Additionally, consider using high-quality paint and tools to ensure durability and long-lasting results. With patience and attention to detail, you can successfully paint dark wood white, adding a fresh and modern touch to any room.