Removing glued down wood flooring can be a challenging task, but with the right tools and techniques, it can be done effectively.
One method is to use a floor scraper or a chisel to carefully lift and remove the flooring.

Another option is to apply heat using a heat gun to soften the adhesive and make it easier to scrape off.
It’s important to take your time and work slowly to avoid damaging the subfloor.
Remember to wear protective gear and use proper ventilation when working with adhesive removers or heat guns.
Consulting a professional for guidance or assistance is always recommended to ensure a successful and safe removal process.
Removing Glued Down Wood Flooring: Step-by-Step Guide
Wood flooring adds a touch of elegance and warmth to any space. However, there may come a time when you need to remove glued down wood flooring, either to replace it or to address underlying issues. While this task may seem daunting, with the right tools and techniques, you can successfully remove glued down wood flooring. In this guide, we will provide you with a step-by-step process to make the removal process easier and more efficient.Step 1: Gather the Necessary Tools
Before you begin the removal process, it is important to gather all the necessary tools. These may include:Step 2: Prepare the Workspace
Before starting, ensure that you have a clear and clutter-free workspace. Remove any furniture or obstacles from the area to make the removal process easier.Step 3: Wear Protective Gear
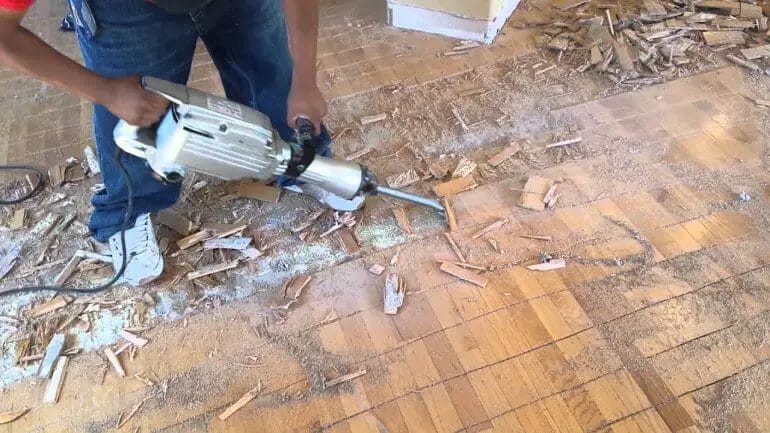
Safety should always be a top priority when engaging in any DIY project. To protect yourself from flying debris and dust, wear safety goggles and a dust mask throughout the removal process.Step 4: Start Removing the Wood Flooring
To begin the removal process, follow these steps:4.1. Locate a Starting Point
Choose a starting point for the removal. This can be a corner or an inconspicuous area of the room. Starting from one end and working your way across the floor can make the process more systematic.4.2. Score the Flooring
Use a utility knife to score the wood flooring along the seams. This will help loosen the adhesive and make it easier to remove.4.3. Pry up the First Board
Insert a pry bar or crowbar beneath the scored board and gently pry it up. Be careful not to damage the subfloor during this process.4.4. Continue Removing the Flooring
Once the first board is removed, repeat the process for the remaining boards. Use a floor scraper or chisel to loosen any stubborn pieces or adhesive.4.5. Clean the Subfloor
After removing all the wood flooring, thoroughly clean the subfloor to remove any remaining adhesive or debris. This will ensure a smooth surface for the installation of new flooring, if desired.Step 5: Dispose of the Removed Flooring
Properly dispose of the removed wood flooring and any other waste materials generated during the removal process. Check with your local waste management facility for the appropriate disposal methods and regulations.Step 6: Consider Professional Help
Removing glued down wood flooring can be a labor-intensive and time-consuming task. If you are unsure about your ability to complete the process safely and efficiently, it may be best to seek professional help. Professional flooring contractors have the experience and specialized tools to handle the removal process effectively.Summary
Removing glued down wood flooring requires careful planning and the right tools. By following this step-by-step guide, you can successfully remove the wood flooring, preparing the space for new flooring or addressing any underlying issues. Remember to prioritize safety by wearing protective gear throughout the process, and consider seeking professional help if needed. With patience and diligence, you can achieve a successful wood flooring removal project.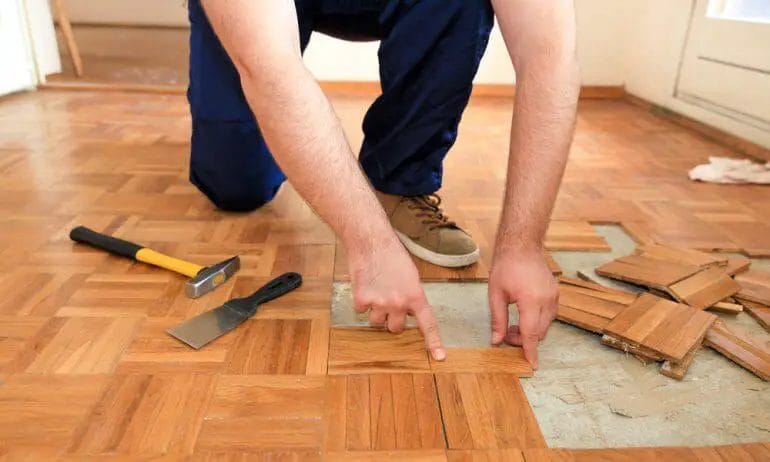
Dealing with Stubborn Glue Residue: Tips and Tricks
Glue residue can be a frustrating and stubborn problem to deal with. Whether you have recently removed a sticker, label, or adhesive tape, the sticky residue left behind can be unsightly and difficult to remove. Fortunately, there are several tips and tricks that can help you effectively tackle this issue. In this section, we will discuss some effective methods to deal with stubborn glue residue.
1. Use Heat
One of the simplest and most effective ways to remove stubborn glue residue is by using heat. Applying heat to the residue helps soften the glue, making it easier to scrape or wipe away. You can use a hairdryer or a heat gun to heat up the glue residue. Keep the heat source a few inches away from the residue and move it in a circular motion to prevent damage to the surface. Once the residue has softened, use a clean cloth or a plastic scraper to gently remove it.
2. Try Solvents
If heat alone doesn’t do the trick, you can try using solvents to dissolve the glue residue. There are several solvents that are effective in breaking down adhesive substances. Common solvents include rubbing alcohol, nail polish remover (containing acetone), white vinegar, and citrus-based cleaners. Apply a small amount of the solvent to a clean cloth and gently rub the residue until it starts to dissolve. Be sure to test the solvent on a small, inconspicuous area first to ensure it doesn’t damage or discolor the surface.
3. Use Oil or Cooking Spray
Another effective method to remove stubborn glue residue is by using oil or cooking spray. Apply a small amount of oil or cooking spray to the residue and let it sit for a few minutes. The oil helps to break down the adhesive properties of the glue, making it easier to wipe away. After letting it sit, use a clean cloth to gently rub the residue in a circular motion until it lifts off the surface. Once the residue is removed, clean the area with soap and water to remove any oily residue.
4. Baking Soda and Water Paste
Baking soda is a versatile household ingredient that can be used for various cleaning purposes, including removing glue residue. Create a paste by mixing baking soda with a small amount of water until it forms a thick consistency. Apply the paste to the glue residue and let it sit for about 15 minutes. Then, use a damp cloth to gently scrub the residue in a circular motion until it loosens and comes off. Rinse the area with water and pat it dry.
5. Commercial Adhesive Removers
If the above methods do not work, you can consider using commercial adhesive removers. There are many adhesive remover products available in the market that are specifically designed to dissolve and remove stubborn glue residue. Follow the instructions provided on the product packaging and test it on a small area before applying it to the entire residue. Be sure to wear protective gloves and work in a well-ventilated area when using chemical-based adhesive removers.
In summary, dealing with stubborn glue residue can be a hassle, but with the right techniques, it can be effectively removed. Whether you choose to use heat, solvents, oil, baking soda paste, or commercial adhesive removers, it’s important to be patient and gentle when removing the residue. Always test any method or product on a small, inconspicuous area first to ensure it doesn’t cause any damage. By following these tips and tricks, you can successfully get rid of stubborn glue residue and restore the cleanliness of your surfaces.
Repairing and Preparing the Subfloor: Getting ready for new flooring
When it comes to installing new flooring, one of the most important steps is ensuring that the subfloor is in good condition. The subfloor is the layer of material that sits beneath the finished floor and provides a stable foundation for the flooring. If the subfloor is damaged or uneven, it can cause problems with the new flooring installation, such as squeaking, movement, or premature wear.
Before you start any flooring installation project, it’s essential to thoroughly inspect the subfloor and make any necessary repairs. Here are some steps to help you repair and prepare the subfloor for new flooring:
1. Remove the old flooring:
The first step in preparing the subfloor is to remove the existing flooring. This may include carpet, tile, vinyl, or any other type of flooring. Carefully remove the flooring material, being cautious not to damage the subfloor underneath.
2. Inspect for damage:
Once the old flooring is removed, carefully inspect the subfloor for any signs of damage, such as water stains, rotting, or cracks. It’s crucial to address any issues before proceeding with the new flooring installation.
3. Repair any damage:
If you find any damage to the subfloor, it’s essential to repair it before installing the new flooring. The specific repair method will depend on the type and extent of the damage. For example, if there are small cracks, you may be able to fill them with a wood filler or patching compound. However, if the damage is more extensive, you may need to replace sections of the subfloor.
4. Clean the subfloor:
Once any necessary repairs have been made, it’s important to clean the subfloor thoroughly. Remove any debris, dust, or dirt using a broom or vacuum cleaner. Make sure the surface is clean and free from any loose particles that could affect the new flooring installation.
5. Level the subfloor:
Before installing new flooring, it’s crucial to ensure that the subfloor is level. Uneven areas can cause the new flooring to have gaps or not lay flat, leading to potential problems in the future. Use a leveling compound to fill in any low spots and sand down any high spots to create a smooth and even surface.
6. Install a vapor barrier:
In some cases, it may be necessary to install a vapor barrier on top of the subfloor. A vapor barrier helps to prevent moisture from seeping up through the subfloor and causing damage to the new flooring. Consult with a flooring professional to determine if a vapor barrier is necessary for your specific flooring type and installation.
7. Allow for acclimation:
Before installing the new flooring, it’s important to allow it to acclimate to the room’s temperature and humidity levels. Follow the manufacturer’s instructions for acclimation, as different types of flooring may require different amounts of time.
In summary, preparing the subfloor is a critical step in getting ready for new flooring installation. By thoroughly inspecting the subfloor, making any necessary repairs, cleaning, leveling, and installing a vapor barrier if needed, you can ensure a smooth and successful flooring installation that will last for years to come.
Alternative Methods for Removing Glued Down Wood Flooring
Removing glued down wood flooring can be a challenging and time-consuming task. Traditional methods such as using a floor scraper or heat gun can be effective, but they may also damage the subfloor or leave behind stubborn residue. Fortunately, there are alternative methods that can help you remove glued down wood flooring easily and efficiently. In this section, we will explore some of these methods.
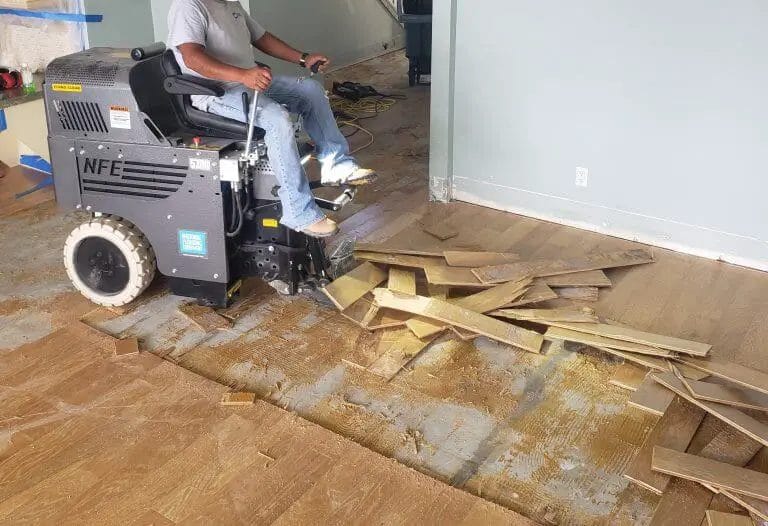
1. Using a Floor Grinding Machine
A floor grinding machine is a powerful tool that can help you remove glued down wood flooring without causing excessive damage to the subfloor. This method involves using a specialized machine with diamond grinding discs to grind away the adhesive and wood layers.
To use this method, start by clearing the room of furniture and debris. Then, mark any areas where the adhesive is particularly thick. Next, set up the floor grinding machine and adjust the depth settings according to the thickness of the flooring. Start grinding in small sections, moving the machine back and forth until the adhesive is completely removed.
While this method can be effective, it is important to wear protective gear such as goggles and a dust mask to avoid inhaling the fine particles generated during the grinding process.
2. Freezing the Adhesive
Another alternative method for removing glued down wood flooring is to freeze the adhesive. This involves using a freezing agent, such as dry ice or liquid nitrogen, to harden the adhesive, making it easier to scrape off.
To use this method, start by protecting the surrounding areas with drop cloths or plastic sheets. Then, apply the freezing agent directly to the adhesive using a sprayer or cloth. Allow the adhesive to freeze for a few minutes until it becomes brittle. Once frozen, use a floor scraper or putty knife to gently pry the wood flooring away from the subfloor.
It is important to note that this method may not be suitable for all types of adhesives. It is recommended to test a small area first to ensure that the freezing agent does not cause any damage.
3. Using a Chemical Adhesive Remover
A chemical adhesive remover can also be an effective alternative method for removing glued down wood flooring. These products are designed to dissolve the adhesive, making it easier to scrape or peel away.
To use this method, apply the adhesive remover directly to the glued areas and allow it to penetrate for the recommended time specified on the product label. Once the adhesive has softened, use a floor scraper or putty knife to carefully remove the wood flooring. Be sure to work in small sections and follow the manufacturer’s instructions closely.
It is important to use caution when working with chemical adhesive removers, as they may contain harsh chemicals. Wear gloves and work in a well-ventilated area to minimize exposure.
4. Cutting the Flooring into Sections
If the glued down wood flooring is particularly stubborn or difficult to remove, an alternative method is to cut the flooring into smaller sections. This method can make it easier to pry the flooring away from the subfloor.
To use this method, start by marking the flooring into manageable sections using a straightedge and a utility knife. Make sure to cut through the wood flooring and adhesive layer. Once the sections are marked, use a reciprocating saw or a circular saw with a fine-tooth blade to carefully cut along the marked lines. After cutting, use a floor scraper or putty knife to pry the sections away from the subfloor.
It is important to exercise caution when using power tools and wear appropriate safety gear, such as goggles and gloves, to protect yourself from potential injuries.
Summary
Removing glued down wood flooring can be a challenging task, but with the right methods, it can be done efficiently and effectively. Alternative methods such as using a floor grinding machine, freezing the adhesive, using a chemical adhesive remover, or cutting the flooring into sections can help you remove the glued down wood flooring without causing excessive damage to the subfloor. When using any of these methods, it is important to follow safety precautions and instructions to ensure a successful removal process.
FAQs
How to remove glued down wood flooring?
To remove glued down wood flooring, start by scoring the surface with a utility knife to break the bond. Then, use a floor scraper or chisel to pry up a corner of the flooring. Use heat from a heat gun to soften the adhesive, making it easier to lift off. Continue this process, working slowly and carefully, until all the flooring is removed.
What tools do I need to remove glued down wood flooring?
To remove glued down wood flooring, you will need a few tools including a utility knife, floor scraper or chisel, heat gun, and a pry bar. These tools will help you score the surface, pry up the flooring, soften the adhesive, and remove the flooring effectively.
Is it a difficult task to remove glued down wood flooring?
Removing glued down wood flooring can be a challenging task, especially if the adhesive is strong. It requires patience, physical effort, and the right tools. However, with proper technique and tools, it is possible to remove glued down wood flooring successfully.
Conclusion:
In conclusion, removing glued down wood flooring can be a challenging task, but with the right techniques and tools, it is definitely possible. Whether you are renovating your home or simply replacing the flooring, following a step-by-step process will ensure a smooth removal process. Start by preparing the area and gathering the necessary tools, then begin by scoring the flooring and applying a suitable adhesive remover. With patience and perseverance, you can gradually pry up the planks, taking care to avoid damaging the subfloor. Remember to wear protective gear and consult a professional if needed. With proper planning and execution, you can successfully remove glued down wood flooring and achieve the desired results.