If you’re looking to cut a perfect circle in wood, a jigsaw is a versatile tool that can get the job done. With its narrow blade and ability to make curved cuts, a jigsaw can easily create circular shapes in various wood projects. To start, attach a hole saw guide or a makeshift jig to your workpiece to act as a template. Then, carefully guide the jigsaw along the marked line, making sure to use a slow and steady cutting motion. With some practice and patience, you can achieve precise and clean circular cuts with a jigsaw.
Essential Safety Precautions for Cutting Circles with a Jigsaw
When it comes to cutting circles with a jigsaw, safety should be your top priority. While jigsaws are versatile tools that can create intricate shapes, it’s important to follow some essential safety precautions to avoid accidents and injuries. In this section, we will discuss the key safety measures you should take when using a jigsaw to cut circles.

1. Wear Personal Protective Equipment (PPE)
Prior to using a jigsaw, ensure you are wearing the necessary personal protective equipment (PPE) to minimize any potential hazards. This includes safety glasses to protect your eyes from flying debris, earplugs or earmuffs to protect your hearing from the noise, and a dust mask to prevent inhalation of fine dust particles.
2. Choose the Right Blade
Using the appropriate type of blade is crucial for cutting circles effectively and safely. Select a jigsaw blade that is specifically designed for cutting curves and has a high tooth count. A fine-tooth blade will provide smoother cuts and reduce the chances of the blade getting stuck.
3. Secure Your Workpiece
Before you start cutting, make sure your workpiece is securely clamped or firmly held in place. This will prevent the material from shifting or moving during the cutting process, reducing the risk of accidents. It is also important to ensure that the area around you is clear of any obstructions or tripping hazards.
4. Plan Your Cut and Mark the Circle
Take the time to plan your cut and mark the circle accurately on your workpiece. Use a compass or a round object of the desired size to create a clear outline of the circle. Double-check the markings before proceeding to ensure the accuracy of your cut.
5. Start Slowly and Maintain Control
When initiating the cut, start the jigsaw at a low speed and gradually increase it as you gain control and confidence. Avoid forcing the blade through the material, as this can lead to kickbacks or the blade getting stuck. Let the jigsaw do the work and guide it along the marked line while maintaining a steady hand.
6. Keep Your Hands Clear
Always keep your hands clear of the cutting line and away from the blade. Use a handle or a suitable grip to keep a safe distance and maintain control over the jigsaw. Never reach over the blade or try to support the material with your hand while cutting.
7. Use a Cutting Guide
If you are cutting larger circles, consider using a cutting guide or a circular cutting attachment specifically designed for jigsaws. This will help you achieve more precise and consistent cuts, reducing the chances of the blade veering off the marked line.
8. Allow the Blade to Cool Down
Jigsaw blades can become hot during prolonged use. To prevent overheating and potential burns, allow the blade to cool down before changing it or touching it. This will ensure your safety during the cutting process.
9. Clean Up the Work Area
Once you have completed your cutting task, take the time to clean up the work area. Remove any debris, dust, or leftover materials to maintain a safe and organized workspace for future projects.
10. Store the Jigsaw Properly
After using the jigsaw, store it in a secure place that is out of reach of children or unauthorized individuals. Make sure the blade is properly stored and the tool is safely stored to prevent any accidental injuries.
By following these essential safety precautions, you can minimize the risk of accidents and injuries while cutting circles with a jigsaw. Remember, safety should always come first when working with power tools. Stay vigilant, use common sense, and prioritize your well-being.
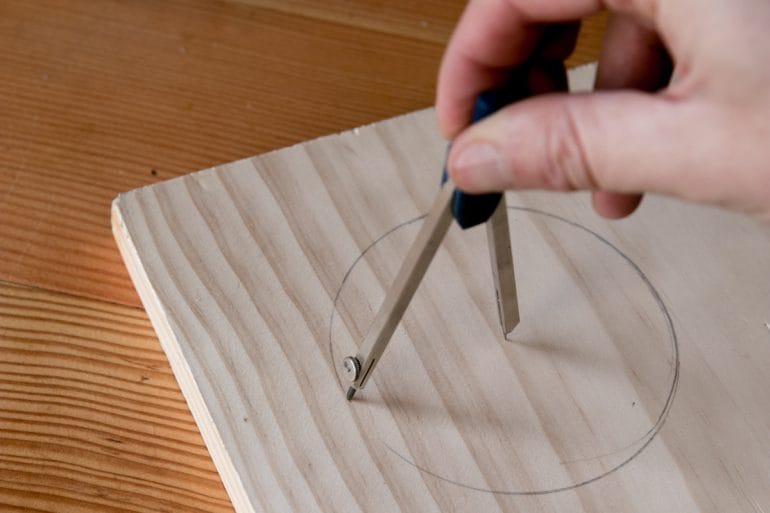
Marking and Centering the Circle on the Wood
Once you have selected the piece of wood for your project, the next step is to mark and center the circle on the wood. This is an important step to ensure that the circle is symmetrical and in the desired location on the wood. Here are the steps to follow:
- Measure and determine the diameter of the circle you want to mark on the wood. Use a ruler or a measuring tape to accurately measure the desired diameter.
- Locate the center of the wood. To find the center, measure the length and width of the wood and mark the halfway point of each measurement. The point where the two measurements intersect is the center of the wood.
- Using a compass or a circle template, place the center point of the tool on the center of the wood. Adjust the distance between the center point and the pencil or marker to match the desired radius of the circle.
- Hold the compass or circle template firmly against the wood and rotate it in a circular motion. This will create a perfect circle on the surface of the wood.
- Double-check the position and symmetry of the marked circle on the wood. Make any necessary adjustments to ensure that it is centered and aligned correctly.
It is important to take your time during this process to ensure accuracy and precision. Carefully measuring and marking the circle will help you achieve the desired result in your project. Once you have successfully marked and centered the circle on the wood, you can proceed with cutting or any other woodworking techniques as needed.
Techniques for Cutting a Perfect Circle with a Jigsaw
When it comes to cutting a perfect circle with a jigsaw, there are a few techniques that you can employ to achieve precise and clean results. Whether you are working on a DIY woodworking project or a professional job, these techniques can come in handy. In this section, we will explore some of the most effective methods for cutting a perfect circle with a jigsaw.
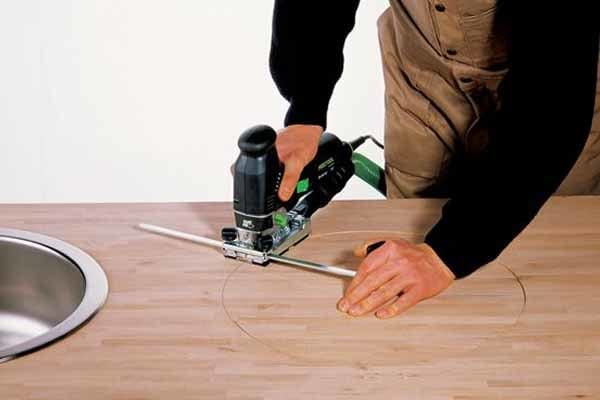
1. Using a Circle Cutting Jig
A circle cutting jig is a handy accessory that can be attached to your jigsaw, allowing you to create circles of various sizes with ease. This jig typically consists of a baseplate with a centering pin and an adjustable arm that acts as a guide for your jigsaw. To use a circle cutting jig:
- Start by securing your workpiece firmly to the workbench or any other suitable surface.
- Attach the circle cutting jig to your jigsaw according to the manufacturer’s instructions.
- Position the centering pin of the jig at the desired center point of your circle.
- Adjust the arm of the jig to the desired radius of your circle.
- Start the jigsaw and guide it along the arm of the jig, keeping the blade aligned with the marked line for the circle.
- Continue cutting until you have completed the circle.
Using a circle cutting jig ensures accuracy and helps you maintain a consistent radius throughout the cutting process.
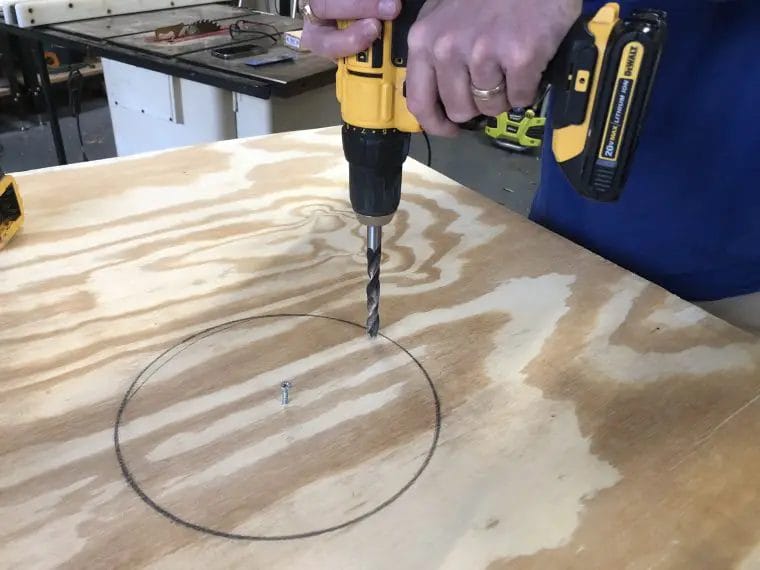
2. Creating a Circle Cutting Template
If you don’t have a circle cutting jig, you can still cut a perfect circle with a jigsaw by creating a circle cutting template. Here’s how:
- Draw the desired circle on a piece of sturdy material, such as plywood or MDF.
- Carefully cut out the circle using a bandsaw or a coping saw, ensuring that you stay as close as possible to the marked line.
- Sand the edges of the cutout to smooth any roughness.
- Secure the template onto your workpiece using clamps or adhesive.
- Drill a hole near the center of the circle, large enough to fit the jigsaw blade.
- Insert the jigsaw blade into the drilled hole and start cutting along the marked line.
- Move the jigsaw smoothly along the template, following the circular path until you complete the cut.
Using a circle cutting template allows you to achieve precise circles without the need for additional tools.
3. Practicing Freehand Cutting
If you have experience and confidence in your jigsaw skills, you can attempt freehand cutting to create a perfect circle. However, this technique requires steady hands and precision control over the jigsaw. Here’s how to cut a circle freehand:
- Mark the center of your circle on the workpiece.
- Create a starting point by making a small notch or hole at the marked center.
- Start the jigsaw and carefully guide the blade into the starting point.
- Begin cutting along the marked line, maintaining a steady and controlled movement.
- Rotate the workpiece as needed to follow the circular path.
- Continue cutting until you have completed the circle.
Freehand cutting requires practice and precision, but it can be a viable option if you are experienced with using a jigsaw.
4. Finishing and Sanding
After you have successfully cut your perfect circle with a jigsaw, it’s essential to finish and sand the edges for a smooth and polished result. Use sandpaper or a sanding block to remove any roughness or splinters along the cut edge. Take your time and work gradually to achieve a professional-looking finish.
Summary
Cutting a perfect circle with a jigsaw can be accomplished using various techniques. Using a circle cutting jig provides accuracy and consistency, while creating a circle cutting template allows for precise circles without additional tools. For those with advanced skills, freehand cutting can also be an option. Regardless of the technique you choose, don’t forget to finish and sand the edges for a polished outcome. With these techniques, you can confidently tackle projects that require precise circular cuts with your jigsaw.
Finishing and Smoothing the Edges of the Wood Circle
Once you have successfully cut out a perfect wood circle for your project, the next step is to finish and smooth the edges. This is an important step to ensure a professional and polished look for your final product. In this section, we will discuss the techniques and tools you can use to achieve smooth and even edges for your wood circle.
Sanding
The first and most common method for finishing and smoothing the edges of a wood circle is by sanding. Sanding helps to remove any roughness or imperfections, making the edges smooth and ready for further finishing. Follow these steps to sand the edges of your wood circle:
- Start with a coarse sandpaper, such as 80-grit, to remove any large imperfections or roughness from the edges. Hold the sandpaper firmly in your hand and move it in a circular motion along the edge of the wood circle. Be sure to apply even pressure and keep the sandpaper flat against the wood surface.
- Once you have removed the major imperfections, switch to a finer sandpaper, such as 120-grit, to further smooth the edges. Repeat the circular sanding motion, gradually working your way from coarse to finer grits of sandpaper.
- After you have achieved a smooth surface, switch to an even finer sandpaper, such as 220-grit, for a final sanding. This will help to create a polished and refined look for the edges of your wood circle.
- Remember to dust off the wood circle after each sanding session to remove any debris or particles. You can use a clean cloth or a brush to do this.
Using a Router
If you want to achieve a more decorative edge for your wood circle, you can use a router. A router is a power tool that can create various edge profiles and shapes. Follow these steps to use a router to finish the edges of your wood circle:
- Choose the desired router bit that will create the edge profile you want. There are many different router bits available, such as chamfer bits, roundover bits, and ogee bits.
- Secure the wood circle firmly in a vise or clamp it down to a workbench to ensure stability during the routing process.
- Adjust the depth of the router bit according to the thickness of your wood circle. It is recommended to make multiple passes with a shallower depth to prevent any tear-out or splintering.
- Slowly guide the router along the edge of the wood circle, moving in a clockwise direction. Take care to maintain a consistent speed and pressure to achieve an even and smooth edge.
- Once you have completed routing the entire edge, sand the profiled edge lightly to remove any roughness or imperfections.
Applying a Finish
After sanding or routing the edges of your wood circle, it is important to apply a finish to protect the wood and enhance its appearance. There are various types of finishes you can use, such as paint, stain, or clear varnish. Follow these steps to apply a finish to the edges:
- If you choose to paint the edges, start by applying a primer coat to ensure good adhesion. Once the primer is dry, you can apply your desired paint color. Use a brush or a roller for a smooth and even application.
- If you prefer a stained finish, apply the stain with a brush or a cloth, following the manufacturer’s instructions. Allow the stain to penetrate the wood, and then wipe off any excess stain with a clean cloth.
- If you want to highlight the natural beauty of the wood, you can apply a clear varnish or polyurethane. Use a brush or a foam applicator to apply the varnish in thin, even coats. Allow each coat to dry completely before applying the next one.
In summary, finishing and smoothing the edges of a wood circle is an important step in achieving a professional and polished look for your project. Whether you choose to sand or use a router, always take your time and pay attention to detail. Don’t forget to apply a suitable finish to protect and enhance the wood’s appearance. With these techniques and tools, you can create beautiful and well-finished wood circles for your woodworking projects.
FAQs
1. How can I cut a circle in wood using a jigsaw?
To cut a circle in wood using a jigsaw, start by marking the center of the circle on the wood. Drill a small hole at the center point, then attach the jigsaw blade through the hole. Turn on the jigsaw and carefully follow the marked circle, keeping the blade perpendicular to the wood.
2. What type of jigsaw blade should I use for cutting circles in wood?
For cutting circles in wood with a jigsaw, it is recommended to use a scroll-cutting or a narrow-width blade. These blades have finer teeth and are more suitable for making curved cuts accurately.
3. Are there any tips to ensure a smooth and precise circle cut with a jigsaw?
Yes, there are a few tips to ensure a smooth and precise circle cut with a jigsaw. Start by using a sharp blade and go slowly to maintain control. Use a guide or a template to follow the circle’s outline. Also, consider securing the wood piece firmly to prevent any unwanted movement during the cutting process.
Conclusion:
In conclusion, cutting a circle in wood with a jigsaw is an achievable task with the right technique and tools. By following the steps mentioned earlier, including marking the center point, drilling a starter hole, and making steady, controlled cuts, you can create precise and clean circular shapes in wood. Remember to use a proper blade for cutting curves and to practice on scrap wood before attempting the final cut. With practice and patience, you can master the art of cutting perfect circles in wood using a jigsaw. So, go ahead, unleash your creativity, and start creating beautiful circular designs in wood!
