Looking to cut a groove in wood by hand? You’re in the right place! Cutting a groove manually can be a satisfying and efficient way to achieve precise and customized results. Whether you’re a DIY enthusiast or a professional woodworker, with the right tools and techniques, you can create clean and accurate grooves that perfectly fit your project needs.
The key to cutting a groove by hand lies in selecting the right tool for the job. A chisel, router plane, or a plow plane are commonly used tools that can help you achieve the desired groove width and depth.

Before you start cutting, make sure to mark the groove’s location on the wood surface and use a straightedge or guide to ensure straight and consistent cuts. Take your time and work with steady, controlled movements to prevent any mistakes or accidents.
When cutting the groove, remember to start with shallow passes and gradually deepen the cut until the desired depth is achieved. Take breaks when needed and regularly check your progress to ensure you’re on track.
Once the groove is cut, make sure to clean up any rough edges or debris left behind. Sanding or using a file can help you achieve a smooth and polished finish.
Remember, practice makes perfect! The more you work with different tools and techniques, the more confident and skilled you’ll become at cutting grooves in wood by hand.
Step-by-Step Guide to Cutting a Groove in Wood by Hand
If you are a woodworker or a DIY enthusiast, you may find yourself needing to cut a groove in wood for various projects. Whether it’s for joinery, creating decorative details, or adding functional features, cutting a groove can be done with precision and craftsmanship. In this step-by-step guide, we will walk you through the process of cutting a groove in wood by hand.
Step 1: Gather the necessary tools and materials
Before you begin, make sure you have all the tools and materials you need for the job. Here’s a list of items you will need:
- A piece of wood
- A marking tool
- A chisel
- A mallet
- A straightedge or ruler
- A saw (if needed)
- Sandpaper
Step 2: Mark the groove location
Using a straightedge or ruler, measure and mark the location where you want to cut the groove on the wood. This will serve as your guide throughout the process.
Step 3: Prepare the wood
If your wood piece is not the desired thickness, you may need to saw it to size using a saw. Make sure to secure the wood piece firmly before making any cuts. Once you have the desired thickness, use sandpaper to smooth any rough edges.
Step 4: Score the groove
Using a marking tool, score along the marked lines to create an initial outline of the groove. This will help guide your chisel as you start cutting.
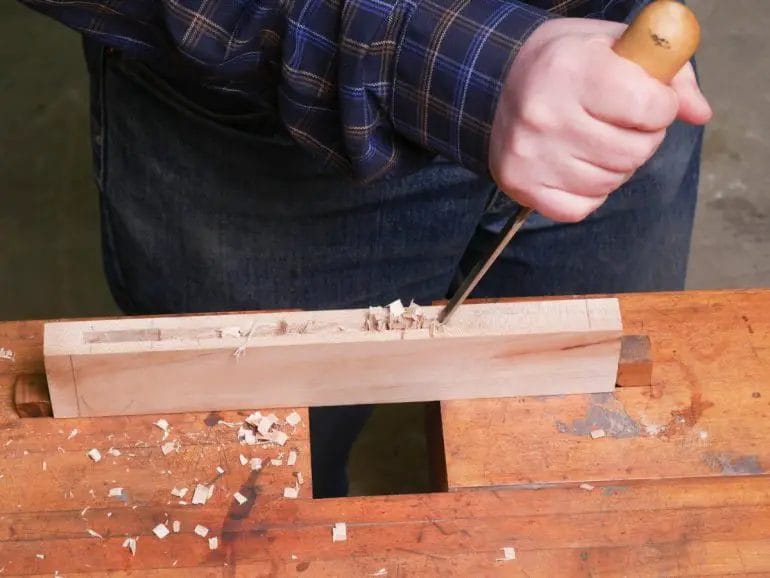
Step 5: Chisel out the groove
Place your chisel on the scored line at one end of the groove and tap it gently with a mallet to create a shallow cut. Repeat this process along the entire length of the groove, gradually increasing the depth with each pass. Be sure to keep the chisel perpendicular to the wood to ensure a straight and clean cut.
Step 6: Clean and refine the groove
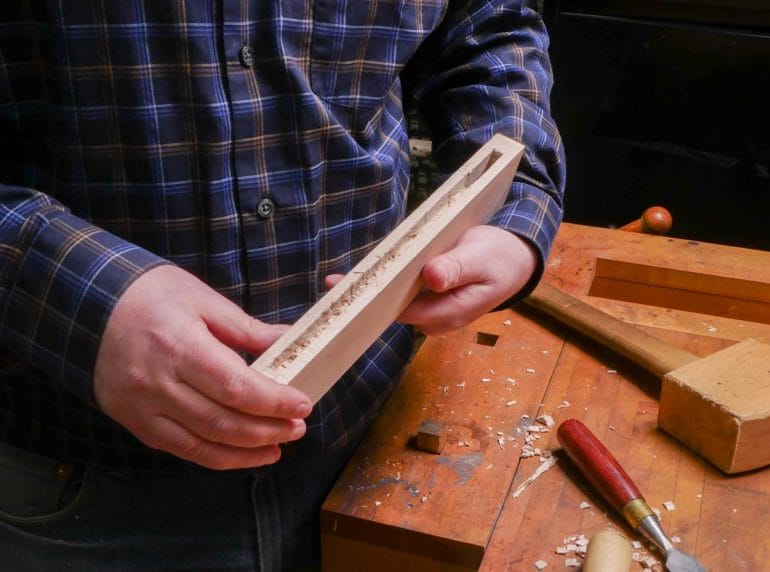
Once the groove has been chiseled to the desired depth, use the chisel to remove any excess wood along the sides of the groove. Take your time to ensure a neat and even groove.
Step 7: Test the groove
Before considering the groove complete, it’s important to test its fit. Make sure the piece that will fit into the groove slides in smoothly and snugly. If needed, make any necessary adjustments or refinements to achieve the desired fit.
Step 8: Sand and finish
Finally, use sandpaper to smooth any rough edges or imperfections in the groove. You can also apply a finish or sealant to protect the wood and enhance its appearance.
In summary, cutting a groove in wood by hand requires careful measurement, marking, and chiseling. With the right tools and techniques, you can achieve precise and clean grooves for your woodworking projects. Remember to take your time and work with caution to ensure the best results.

Tips and Techniques for Achieving Clean and Accurate Grooves
When it comes to woodworking, achieving clean and accurate grooves is essential for a professional-looking finish. Whether you are building furniture or working on a DIY project, grooves are commonly used to join pieces of wood together or allow for the insertion of panels. In this section, we will explore some tips and techniques to help you achieve clean and accurate grooves in your woodworking projects.
1. Measure and Mark Carefully
To ensure accurate grooves, it is crucial to measure and mark your workpiece carefully. Use a quality measuring tool, such as a tape measure or a combination square, to determine the precise dimensions of your groove. Take your time to mark the starting and ending points of the groove accurately. This will serve as a guide for your cutting tools and help you achieve clean and precise results.
2. Choose the Right Cutting Tool
The choice of cutting tool plays a significant role in achieving clean and accurate grooves. There are several options to consider, including a table saw, a router, or a dado blade. Each tool has its advantages and is suitable for different types of grooves. For narrow and shallow grooves, a router with a straight bit may be the best option. On the other hand, a table saw with a dado blade is more suitable for wider and deeper grooves. Take the time to understand the capabilities of each tool and select the one that best fits your specific groove requirements.
3. Use a Guide or Jig
Using a guide or jig can help you achieve consistent and accurate grooves. A straightedge guide can be clamped onto your workpiece to ensure a straight and even cut. You can also create custom jigs for specialized grooves, such as tongue and groove joints. These jigs act as templates and guide your cutting tool, resulting in precise and repeatable grooves. Invest time in creating or purchasing suitable guides and jigs to enhance the accuracy of your groove cuts.
4. Take Multiple Passes
When cutting deeper grooves, it is advisable to take multiple passes rather than trying to achieve the full depth in a single cut. This not only reduces the strain on your cutting tools but also allows for better control and precision. Start with a shallow cut and gradually increase the depth with each pass until you reach the desired groove depth. Remember to adjust your cutting tool’s height or setting accordingly for each pass to maintain accuracy.
5. Practice Proper Technique
Lastly, practicing proper technique is essential for achieving clean and accurate grooves. Maintain a steady and consistent feed rate while cutting, and use a smooth and controlled motion. Avoid rushing or applying excessive force, as this can lead to uneven cuts. Take the time to practice on scrap wood before working on your actual project to hone your skills and improve your precision.
Summary
Achieving clean and accurate grooves is crucial for woodworking projects. By measuring and marking carefully, choosing the right cutting tool, using guides or jigs, taking multiple passes, and practicing proper technique, you can ensure precise and professional-looking grooves in your workpieces. Implement these tips and techniques in your woodworking practice to elevate the quality of your projects and achieve impressive results.
Common Mistakes to Avoid When Hand-Cutting Wood Grooves
Hand-cutting wood grooves can be a challenging task, especially for beginners. It requires precision and attention to detail to ensure the grooves are clean and accurate. However, there are some common mistakes that people make when hand-cutting wood grooves. In this section, we will discuss these mistakes and provide tips on how to avoid them.
1. Incorrect Measurement
One of the most common mistakes when hand-cutting wood grooves is using incorrect measurements. Accurate measurements are crucial for ensuring the grooves fit properly and serve their intended purpose. Before making any cuts, double-check your measurements to ensure they are accurate. Use a tape measure or ruler and mark the measurements clearly on the wood. This will help you avoid mistakes and save time in the long run.
2. Poor Marking Techniques
Poor marking techniques can lead to inaccurate cuts and uneven grooves. It is important to mark the groove lines clearly and precisely on the wood before making any cuts. Use a sharp pencil or a marking knife for accurate marking. Take your time to ensure the lines are straight and parallel to each other. This will help guide your cuts and result in clean grooves.
3. Inadequate Sawing Technique
The way you handle the saw plays a crucial role in the outcome of your grooves. One common mistake is applying too much pressure or force when sawing. This can lead to uneven cuts and damaged wood. Instead, use a light and controlled grip on the saw, allowing the blade to do the work. Take your time and make slow, steady cuts to maintain accuracy.
4. Lack of Proper Chiseling
After making the initial cuts with a saw, you will need to use a chisel to remove the waste material and refine the grooves. One mistake to avoid is using the wrong size or type of chisel. Make sure you select a chisel that matches the width of the groove and is sharp enough to cut through the wood smoothly. Take your time to chisel away the waste material carefully, ensuring the groove remains clean and precise.
5. Neglecting Sanding and Finishing
Once you have completed the cutting and chiseling process, it is important not to neglect sanding and finishing the grooves. Neglecting this step can result in rough and uneven grooves. Use sandpaper to smooth out any rough areas and ensure the grooves are clean and ready for finishing. You can then apply a wood finish or stain to enhance the appearance of the grooves and protect the wood.
6. Rushing the Process
One of the biggest mistakes when hand-cutting wood grooves is rushing the process. It is important to take your time and work patiently and methodically. Rushing can lead to mistakes and poor-quality grooves. Remember to plan your cuts and follow the proper techniques for each step. By being patient and meticulous, you will achieve clean and precise wood grooves.
In summary, hand-cutting wood grooves requires attention to detail and precision. By avoiding common mistakes such as incorrect measurement, poor marking techniques, inadequate sawing technique, lack of proper chiseling, neglecting sanding and finishing, and rushing the process, you can achieve clean and accurate grooves in your woodwork projects.
Alternative Methods for Cutting Wood Grooves by Hand
Woodworking enthusiasts often rely on power tools to cut grooves in wood, such as using a table saw or router. However, there may be situations where power tools are unavailable or not practical to use. In such cases, alternative methods for cutting wood grooves by hand can be employed. These methods require a bit more manual effort, but can still produce precise and clean results. In this section, we will explore some alternative methods for cutting wood grooves by hand.
1. Chisel and Mallet Method
One of the simplest and most traditional methods for cutting wood grooves by hand is using a chisel and mallet. This method involves marking the desired groove with a pencil or marking gauge, then carefully chiseling out the waste material. The width and depth of the groove can be controlled by using a suitably sized chisel and adjusting the depth of the cut with each pass. This method requires patience and precision, but it can be effective for smaller grooves or when working with delicate or curved surfaces.
2. Hand Saw and Chisel Method
Another alternative method involves using a hand saw and chisel in combination. This method is particularly useful for cutting longer grooves or when working with thicker pieces of wood. The process begins by carefully making multiple saw cuts along the length of the groove, forming a series of kerfs. These kerfs create a guide for the chisel, which can then be used to remove the waste material between the saw cuts. By repeating this process, the desired groove can be achieved. It is important to use a sharp chisel and ensure the saw cuts are straight and aligned for clean and accurate results.
3. Plow Plane Method
A plow plane is a specialized hand tool designed specifically for cutting grooves in wood. This method requires the use of a plow plane with a dedicated groove-cutting blade. The plow plane is guided along the surface of the wood, allowing the blade to remove the waste material and create the groove. This method offers greater control and precision compared to using chisels or saws. However, it does require the use of a specialized tool and may take some practice to master.
4. Router Plane Method
A router plane is another hand tool that can be used to cut grooves in wood. This method involves using a router plane with an appropriate cutting blade to remove the waste material and create the groove. The router plane is guided along the surface of the wood, similar to the plow plane method. It provides greater control and accuracy compared to chisels or saws, but also requires the use of a specialized tool.
5. Dado Saw Method
A dado saw, also known as a dado blade, is a circular saw blade specifically designed for cutting grooves. This method requires the use of a dado saw blade on a hand-held circular saw or table saw. The dado blade can be adjusted to the desired width and depth of the groove, allowing for precise and efficient cutting. However, it is important to follow safety precautions and ensure proper setup when using a dado blade.
In summary, while power tools are commonly used for cutting wood grooves, alternative methods by hand can be employed when power tools are not available or practical. These methods include using a chisel and mallet, a hand saw and chisel, a plow plane, a router plane, and a dado saw. Each method offers its own advantages and requires different levels of skill and precision. By selecting the most suitable method and practicing proper technique, woodworkers can achieve clean and accurate grooves in their projects.
FAQs
1. How can I cut a groove in wood by hand?
To cut a groove in wood by hand, follow these steps:
1. Mark the location and dimensions of the groove on the wood.
2. Use a chisel or a router plane to score the edges of the groove.
3. Use a narrow chisel to remove the wood between the scored lines.
4. Repeat the process until the desired depth is achieved.
5. Sand the bottom of the groove to smooth and refine the surface.
2. What tools do I need to cut a groove in wood by hand?
To cut a groove in wood by hand, you will need the following tools:
– Marking tools (pencil, ruler, etc.)
– Chisel (preferably a narrow one)
– Router plane or a similar tool
– Sandpaper or sanding block
3. Are there any safety precautions I should take when cutting a groove in wood by hand?
Yes, it is important to take certain safety precautions when cutting a groove in wood by hand:
– Wear safety glasses to protect your eyes from flying wood chips or debris.
– Use a sharp and well-maintained chisel to minimize the risk of accidents.
– Keep your fingers and hands away from the cutting edge of the tools.
– Work in a well-ventilated area to avoid inhaling dust particles.
Conclusion
In conclusion, learning how to cut a groove in wood by hand is a valuable skill for any woodworking enthusiast, allowing you to create precise and customized woodworking projects. By following the steps outlined in this guide, you can easily create grooves using basic hand tools. Remember to take your time, use proper safety precautions, and practice on scrap wood before working on your actual project. With a little patience and practice, you’ll soon be able to create professional-looking grooves to enhance the beauty and functionality of your wooden creations. So go ahead, grab your tools, and start mastering the art of hand-cut grooves in wood!