If you’re looking to add a unique touch to your woodworking projects, learning how to make a wood ball can be a fascinating and rewarding endeavor. Whether you’re a seasoned woodworker or just starting out, crafting a wooden ball allows you to showcase your skills and create an eye-catching decorative piece. In this guide, we’ll take you through the step-by-step process of creating a wood ball from scratch, providing you with the knowledge and techniques needed to achieve a perfect spherical shape.
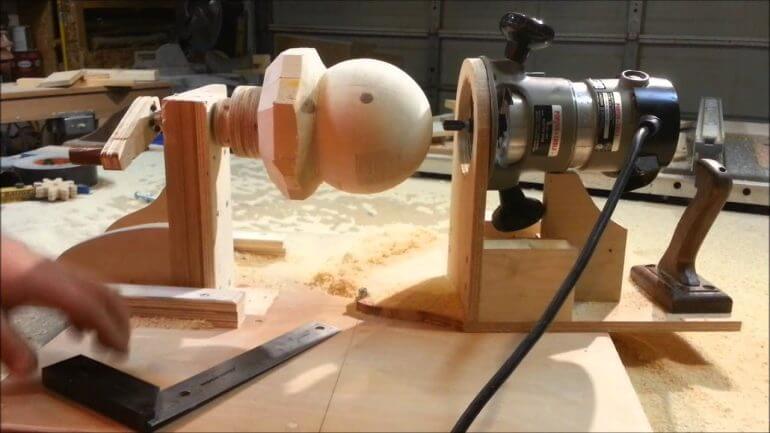
To begin, select a suitable piece of wood that is free from knots, cracks, or other imperfections. Ideally, choose a hardwood species such as maple, cherry, or walnut, as they are known for their strength and durability. Once you have the wood, mark the center point and use a lathe or a bandsaw to rough out the initial shape of the ball.

Next, mount the roughed-out ball securely on a lathe and start shaping it using a variety of turning tools. Begin by removing excess wood and gradually refine the shape, being careful to maintain symmetry and smooth curves. Take your time and work methodically, frequently checking the ball’s shape and adjusting as needed.
As you progress, consider using sandpaper or abrasive pads to smoothen the surface of the wood ball. Start with a coarse grit and gradually work your way up to a finer grit for a polished finish. Remember to sand in the direction of the wood grain to
Choosing the Right Wood for your Wood Ball Project
When embarking on a wood ball project, one of the most important decisions you need to make is selecting the right type of wood. The choice of wood will greatly impact the final outcome and durability of your project. Here are some factors to consider when choosing the right wood for your wood ball project:
1. Hardness
The hardness of the wood is a crucial factor to consider. It determines the strength and durability of the wood ball. Hardwoods like maple, oak, and mahogany are excellent choices as they are known for their hardness. These woods are able to withstand impact and resist denting, making them ideal for wood ball projects that require durability.
2. Grain Pattern
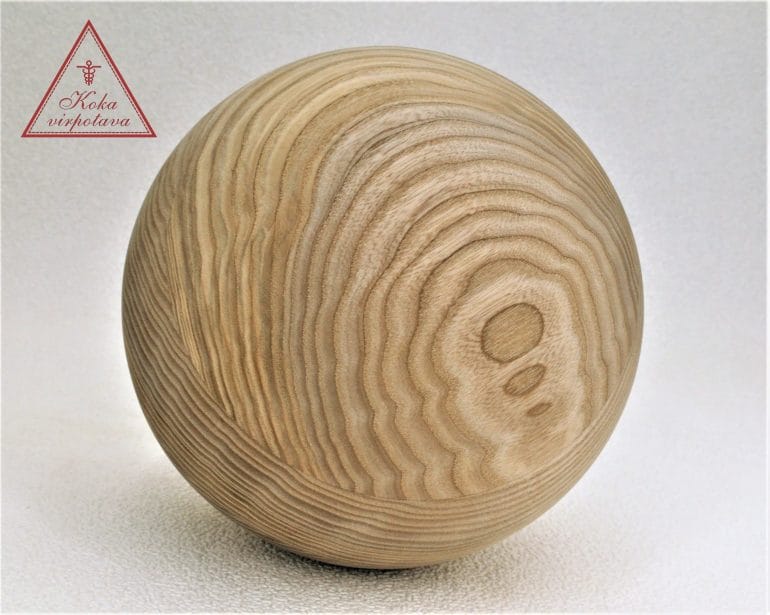
The grain pattern of the wood can add visual appeal to your wood ball project. Some woods, such as walnut and cherry, have prominent and beautiful grain patterns that can enhance the overall aesthetic of the finished product. Consider the desired look and feel for your project and choose a wood with a grain pattern that complements your design.
3. Stability
Wood expands and contracts with changes in humidity and temperature. It’s important to choose a stable wood for your wood ball project to minimize the risk of warping or cracking. Woods like birch and ash are known for their stability and are less likely to warp. Avoid woods that are prone to shrinking or expanding excessively, as this can lead to structural issues in your project.
4. Workability
Consider the workability of the wood when selecting the right material for your wood ball project. Some woods, such as pine and cedar, are easy to work with and are ideal for beginners or those using hand tools. Other woods, like teak and ebony, can be more challenging to work with due to their hardness or density. Choose a wood that matches your skill level and the tools you have available.
5. Sustainability
With increasing environmental concerns, it’s important to consider the sustainability of the wood you choose for your project. Look for woods that are sourced responsibly from well-managed forests or consider using reclaimed wood. Avoid using exotic woods that may come from endangered or illegally logged sources. Choosing sustainable wood helps preserve the environment and supports ethical practices.
6. Cost
Lastly, consider your budget when choosing the right wood for your wood ball project. Different types of woods vary in price, with some being more affordable than others. Exotic or rare woods tend to be more expensive. Consider the cost of the wood and how it fits into your overall project budget.
By considering factors such as hardness, grain pattern, stability, workability, sustainability, and cost, you can choose the right wood for your wood ball project. Remember to match the characteristics of the wood with your project requirements to ensure a successful outcome. Now that you have a better understanding of the factors to consider, you can confidently select the perfect wood for your project.
Step-by-Step Guide to Carving a Wood Ball
Carving a wood ball is not only a rewarding woodworking project, but it also allows you to showcase your creativity and craftsmanship. Whether you’re a beginner or an experienced woodworker, this step-by-step guide will walk you through the process of carving a wood ball.
Materials Needed
- Wood block (preferably hardwood)
- Carving tools (chisels, gouges, carving knife)
- Sandpaper (various grits)
- Wood finish (optional)
Step 1: Selecting the Wood
The first step in carving a wood ball is selecting the right wood. Hardwoods such as maple, cherry, or walnut are ideal for this project, as they are easier to carve and provide a beautiful finish. Choose a wood block that is free of knots and defects.
Step 2: Roughing Out the Shape
Using a saw or a carving knife, rough out the general shape of the ball from the wood block. Start by removing any excess material to create a more manageable workpiece.
Step 3: Cutting the Halves
Once you have roughed out the shape, carefully cut the wood block in half using a saw or a bandsaw. This will create two halves that will be carved separately before being glued back together.
Step 4: Carving the Halves
Take one of the halves and begin carving the ball shape using carving tools such as chisels, gouges, or a carving knife. Start by removing material from the corners and working your way towards the center, creating a smooth, spherical shape.
Step 5: Refining the Shape
Once you have carved the basic shape of the ball, use finer carving tools to refine the shape and add details. Take your time to create smooth curves and eliminate any rough spots or imperfections.
Step 6: Sanding the Surface
After carving and refining the shape, it’s time to sand the surface of the wood ball. Start with a coarse grit sandpaper and gradually work your way up to a finer grit to achieve a smooth and polished finish.
Step 7: Gluing the Halves
Once both halves of the wood ball are carved and sanded, apply wood glue to the mating surfaces and carefully press them together. Use clamps to hold the halves securely in place until the glue dries completely.
Step 8: Final Touches
Once the glue has dried, inspect the wood ball for any imperfections or rough edges. Use sandpaper or carving tools to make any necessary adjustments. If desired, apply a wood finish to enhance the natural beauty of the wood.
Step 9: Enjoy Your Wood Ball
After completing all the steps, you now have a beautifully carved wood ball. Display it as a decorative piece, use it for games, or gift it to someone who appreciates fine woodworking. Enjoy the satisfaction of creating something unique and handcrafted.
In summary, carving a wood ball is a rewarding woodworking project that allows you to showcase your skills and creativity. With the right materials and tools, along with a step-by-step approach, you can create a beautifully carved wood ball that will be admired for years to come.
Adding a Finishing Touch to your Wood Ball
Now that you have successfully carved and shaped your wood ball, it’s time to add the finishing touch that will bring out the natural beauty of the wood and protect it for years to come. Applying a finish not only enhances the appearance of the wood but also helps to seal and protect it from moisture and other elements.
There are several options to choose from when it comes to finishing your wood ball, so let’s take a look at some of the most popular choices:
1. Oil Finishes
Oil finishes, such as linseed oil or tung oil, penetrate the wood and enhance its natural color and grain. These finishes provide a smooth and natural-looking surface while offering some protection against moisture. To apply an oil finish, simply rub it onto the surface of the wood using a clean cloth or brush. Allow the oil to penetrate the wood for a few minutes, then wipe off any excess. Repeat this process as necessary until you achieve the desired level of sheen.
2. Polyurethane
Polyurethane is a popular choice for finishing wood as it provides a durable and glossy finish. It creates a protective layer on the surface of the wood, making it resistant to scratches, stains, and moisture. Polyurethane comes in both water-based and oil-based forms. To apply polyurethane, use a brush or foam applicator to evenly coat the wood surface. Allow each coat to dry before applying additional coats, and sand between coats for a smooth finish.
3. Shellac
Shellac is a classic finish that offers a beautiful and warm amber tone to the wood. It dries quickly and is easy to apply. Shellac comes in liquid form and can be brushed onto the wood. It provides a protective layer while allowing the wood’s natural beauty to shine through. Shellac can be combined with other finishes, such as wax, to further enhance its durability.
4. Varnish
Varnish is a popular choice for outdoor wood projects, as it provides excellent protection against the elements. It creates a hard and durable finish that is resistant to UV rays, moisture, and temperature changes. Varnish can be applied with a brush or sprayed onto the wood. Multiple coats may be necessary to achieve the desired level of protection.
Before applying any finish, it’s important to prepare the wood surface by sanding it smooth and removing any dust or debris. Wipe the wood with a clean cloth to ensure it is free of any contaminants. It’s also a good idea to test the finish on a small, inconspicuous area of the wood to ensure you are happy with the result before applying it to the entire surface of the wood ball.
In summary, adding a finish to your wood ball not only enhances its appearance but also protects it from moisture and other elements. Oil finishes, polyurethane, shellac, and varnish are all popular choices that provide different levels of protection and sheen. Remember to prepare the wood surface properly before applying the finish and test it on a small area first. With the right finish, your wood ball will be a beautiful and lasting piece of artwork.
Creative Ideas for Using Wood Balls in Home Decor or Crafts
Wood balls are versatile and can be used in a variety of creative ways to enhance your home decor or craft projects. These small, spherical pieces of wood can add a unique touch and a natural element to your designs. Whether you are an experienced crafter or a DIY enthusiast, here are some creative ideas for using wood balls:
1. Decorative Accents
Add a touch of elegance to your home by using wood balls as decorative accents. You can create a focal point by placing a group of wood balls in a decorative bowl or tray. Alternatively, you can glue them onto picture frames, mirrors, or candle holders to add texture and visual interest. The natural look and feel of wood balls can complement a variety of interior styles, from rustic to modern.
2. Drawer Knobs
Give your old furniture a fresh new look by replacing the drawer knobs with wood balls. Simply drill a hole through the center of the wood ball and attach it to the drawer using a screw. This simple DIY project can instantly transform the appearance of your furniture and give it a unique and personalized touch.
3. Plant Hangers
Create a unique and eye-catching plant hanger using wood balls. String the wood balls onto a sturdy twine or rope, leaving enough space between each ball to hold a small planter. Hang the plant hanger from the ceiling or a wall hook, and place your favorite potted plants in the hanging planters. This creative plant display will add a touch of warmth and nature to any room.
4. Jewelry Making
Wood balls can be used to create beautiful and organic-looking jewelry pieces. String them together to make unique necklaces or bracelets. You can also paint or dye the wood balls to add a pop of color to your jewelry designs. Combine them with other materials like beads, gemstones, or metal accents to create one-of-a-kind statement pieces.
5. Mobiles and Chimes
Wood balls can be used to create whimsical mobiles or wind chimes. Attach the wood balls to strings or wires of varying lengths and hang them from a wooden or metal frame. Hang the mobile or wind chime near a window or in your outdoor space to enjoy the gentle movement and soothing sounds created by the wood balls.
In summary, wood balls can be a versatile and creative addition to your home decor or craft projects. From decorative accents to drawer knobs, plant hangers to jewelry making, and mobiles to wind chimes, there are countless ways to incorporate wood balls into your designs. Let your creativity flow and explore the endless possibilities of using these small wooden spheres in your next DIY project.
FAQs
How can I make a wood ball?
To make a wood ball, you will need a lathe, a piece of wood, and woodworking tools. Start by mounting the wood on the lathe and shaping it into a rough sphere. Then, use various tools to refine the shape and smooth the surface until you achieve the desired ball shape. Sand and finish the wood ball for a polished look.
Conclusion
In conclusion, learning how to make a wood ball can be a rewarding and creative woodworking project. By following the right techniques and using the appropriate tools, you can create beautifully crafted wooden balls that can be used for various purposes. Whether you want to make decorative pieces, game accessories, or even garden ornaments, the possibilities are endless. Remember to choose the right wood, take precise measurements, and sand and finish the ball carefully to achieve a smooth and polished result. With practice and patience, you can master the art of making wood balls and showcase your woodworking skills with pride.
