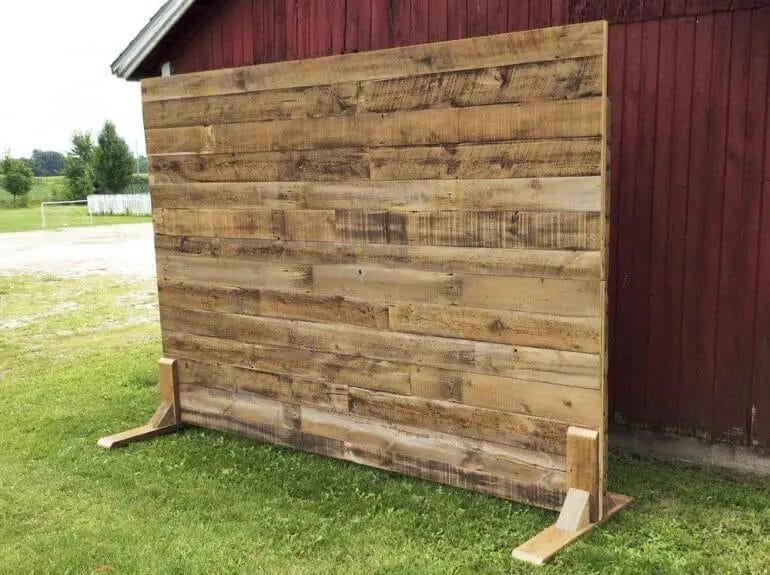
Looking to add a touch of rustic charm to your photoshoots or events? Learn how to make a wooden backdrop stand with this easy DIY tutorial.
A wooden backdrop stand is not only functional but also adds a natural and timeless aesthetic to your photos. It provides stability and support for your backdrop, whether it’s for a wedding, a party, or a professional photoshoot.

In this step-by-step guide, we will show you how to create a sturdy and customizable wooden backdrop stand using affordable materials and basic tools. Get ready to elevate your photography game with this simple yet impressive DIY project.
Step-by-step guide to building a wooden backdrop stand
Are you a photographer looking for a cost-effective and customizable backdrop stand? Building a wooden backdrop stand can be a great solution for you. In this section, we will provide you with a step-by-step guide to building your own wooden backdrop stand.
Materials you will need:
- 2×4 wooden boards
- Wood screws
- Drill
- Saw
- Measuring tape
- Sandpaper
- Paint or stain (optional)
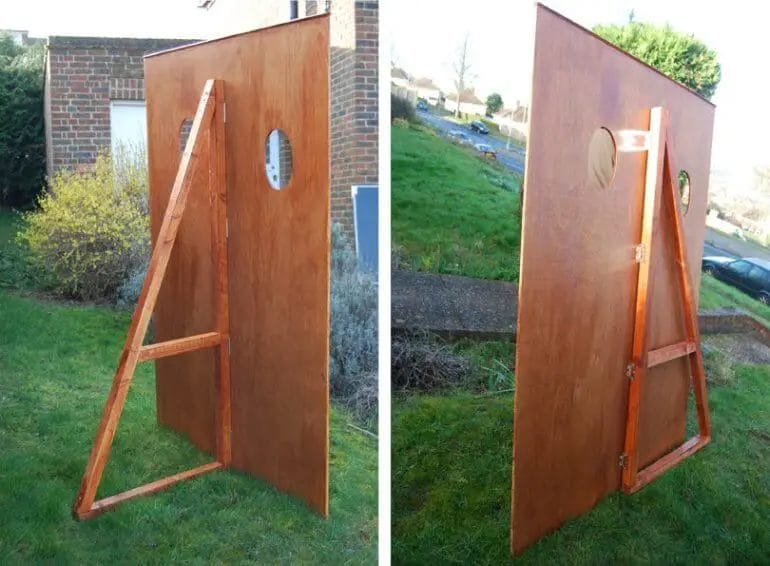
Step 1: Measure and cut the wooden boards
Start by measuring the desired height and width of your backdrop stand. Using a saw, cut the 2×4 wooden boards to the appropriate size. You will need four pieces for the vertical supports and four additional pieces for the horizontal crossbars.
Step 2: Sand the wooden boards
Before assembling the backdrop stand, it is recommended to sand the wooden boards to ensure a smooth surface. This will prevent any splinters and allow for a professional finish.
Step 3: Drill pilot holes
Using a drill, create pilot holes on the horizontal crossbars. These pilot holes will prevent the wood from splitting when you attach the vertical supports.
Step 4: Assemble the frame
Begin by attaching the horizontal crossbars to the vertical supports. Use wood screws to secure the pieces together. Make sure the frame is sturdy and the crossbars are evenly spaced.
Step 5: Optional – Paint or stain the backdrop stand
If desired, you can paint or stain the wooden backdrop stand to match your personal style or studio theme. Apply multiple coats for a more polished look and allow sufficient drying time between each coat.
Step 6: Test the stability
Once the paint or stain has dried, test the stability of the backdrop stand by placing it upright and applying slight pressure. Make any necessary adjustments or reinforcements to ensure it can support the weight of your chosen backdrops.
Step 7: Attach the backdrop
To attach the backdrop to the stand, you can use clamps, clips, or hooks depending on your preference. Ensure the backdrop is securely fastened to prevent any accidental movement or falls during use.
Step 8: Enjoy your customized backdrop stand
Congratulations! You have successfully built your own wooden backdrop stand. Now you can enjoy the flexibility and convenience of a customizable backdrop stand for your photography needs.
Remember, building a wooden backdrop stand allows you to tailor the dimensions and design to suit your specific requirements. It is a cost-effective and practical solution for photographers who frequently work with different backdrops. Give it a try and enhance your photography setup today!

Tips for customizing your wooden backdrop stand
Wooden backdrop stands are a versatile and stylish option for photographers and event planners. They provide a natural and elegant look to any backdrop setting. While wooden stands come in various sizes and designs, there are several ways you can customize them to suit your specific needs and preferences. Here are some tips for customizing your wooden backdrop stand:
1. Choose the right wood
The type of wood you choose for your backdrop stand can significantly impact its overall look and durability. Popular wood options for backdrop stands include pine, oak, and birch. Each wood type has its unique characteristics, such as grain pattern and color. Consider the aesthetic you want to achieve and select a wood type that complements your style.
2. Stain or paint
If you prefer a different color or want to match the backdrop stand with your existing décor, staining or painting the wood is a great option. Staining allows the natural beauty of the wood to show through, while painting gives you the freedom to choose any color you desire. Make sure to prepare the wood surface properly before applying the stain or paint for the best results.
3. Add decorative elements
Enhance the visual appeal of your wooden backdrop stand by adding decorative elements. Consider attaching decorative trims, moldings, or appliques to the frame. These embellishments can add a touch of elegance and sophistication to your backdrop stand. Be creative and choose elements that complement the overall theme or style of your event or photo shoot.
4. Incorporate shelves or hooks
If you need additional storage or hanging space, consider incorporating shelves or hooks into your wooden backdrop stand. This feature can be especially useful for photographers who want to have easy access to props, accessories, or lighting equipment. Shelves can also serve as a decorative display area for small potted plants, frames, or other decorative items.
5. Install wheels or casters
If you frequently move your backdrop stand from one location to another, adding wheels or casters can make transportation much easier. This customization allows you to effortlessly roll the stand to different spots without having to lift or carry it. Make sure to choose sturdy and reliable wheels or casters that can support the weight of the stand and provide smooth mobility.
6. Personalize with branding or signage
If you are using the backdrop stand for commercial purposes or want to showcase your brand, consider personalizing it with branding or signage. You can add your logo, company name, or a custom design to make the stand uniquely yours. This customization not only adds a professional touch but also helps to promote your brand during events or photo shoots.
7. Consider detachable or adjustable components
For added flexibility, consider customizing your wooden backdrop stand with detachable or adjustable components. This allows you to modify the height, width, or arrangement of the stand to accommodate different backdrop sizes or shooting angles. Adjustable stands can be particularly useful if you work with various backdrops or frequently change the setup for different projects.
By following these tips, you can transform your wooden backdrop stand into a personalized and functional piece that perfectly suits your needs and style. Whether you are a photographer, event planner, or simply want to enhance the aesthetics of your space, customizing your wooden backdrop stand can make a significant difference in the overall look and functionality of your setup.
Creative Ideas for Using a Wooden Backdrop Stand
A wooden backdrop stand is a versatile and visually appealing accessory that can be used in a variety of creative ways. Whether you are a professional photographer, an event planner, or simply someone who loves capturing beautiful moments, a wooden backdrop stand can elevate your photography and create stunning visual displays. In this section, we will explore some creative ideas for using a wooden backdrop stand.
1. Photography Backdrops
One of the most common and practical uses of a wooden backdrop stand is for photography backdrops. Whether you are shooting portraits, product photography, or even fashion editorials, a wooden backdrop stand can be a perfect choice. Its natural and rustic look adds depth and character to your images, and it can be easily customized to match the theme or style of your shoot. You can hang different types of fabrics, curtains, or even create your own hand-painted backdrop to achieve the desired look.
2. Event Decorations
Wooden backdrop stands can also be used as a decorative element for various events such as weddings, birthdays, or corporate gatherings. They can serve as a backdrop for photo booths, dessert tables, or even to display signage and directional boards. By adding flowers, fairy lights, or other decorative elements, you can transform a simple wooden backdrop stand into a visually stunning focal point that enhances the overall ambiance of the event.
3. Room Dividers
Another creative idea for using a wooden backdrop stand is to repurpose it as a room divider. If you have an open-concept space or a large room that needs separation, a wooden backdrop stand can be a stylish and functional solution. You can hang lightweight curtains or drapes from the stand to create a temporary partition, adding privacy and defining distinct areas within a room. This is particularly useful for studio apartments, shared living spaces, or even for creating a cozy reading nook in a larger room.
4. Visual Merchandising
Retail stores and boutiques can benefit from the versatility of a wooden backdrop stand for visual merchandising purposes. By using the stand as a backdrop for showcasing products, you can instantly create an eye-catching display that grabs the attention of customers. This is especially effective for highlighting featured items, seasonal promotions, or new arrivals. The natural wood tones of the backdrop stand can complement various product aesthetics, from clothing and accessories to home decor and handmade crafts.
5. DIY Photo Booth
Hosting a party or special event? A wooden backdrop stand can be transformed into a DIY photo booth that will keep your guests entertained and create lasting memories. Set up the backdrop stand in a designated area and hang a fun and colorful backdrop. Provide props, such as hats, masks, and playful signs, for guests to use while taking photos. This interactive element will add a touch of fun and encourage guests to capture their own moments throughout the event.
In summary, a wooden backdrop stand is a versatile and multi-functional accessory that can be used in various creative ways. Whether it’s for photography backdrops, event decorations, room dividers, visual merchandising, or DIY photo booths, a wooden backdrop stand adds a touch of elegance and charm to any setting. So, unleash your creativity and explore the endless possibilities of using a wooden backdrop stand for your next project or event.
Maintenance and Care for Your Wooden Backdrop Stand
Having a wooden backdrop stand can add a touch of elegance and professionalism to your photography or event setup. However, like any other piece of equipment, it requires regular maintenance and care to ensure its longevity and optimal performance. In this section, we will discuss some essential tips and guidelines for maintaining and caring for your wooden backdrop stand.
1. Regular Cleaning
Keeping your wooden backdrop stand clean is crucial for its overall upkeep. Dust, dirt, and grime can accumulate over time and affect the appearance and functionality of your stand. To clean it:
- Start by removing any accessories, such as clamps or hooks, from the stand.
- Gently wipe down the entire stand using a soft, lint-free cloth or sponge dampened with water or a mild soap solution.
- Avoid using abrasive cleaners or harsh chemicals that can damage the wood finish.
- Once cleaned, wipe dry with a clean cloth to prevent moisture damage.
2. Inspection for Damage
Regularly inspecting your wooden backdrop stand for any signs of damage is crucial to address potential issues promptly. Look out for:
- Cracks or splits in the wood
- Loose joints or fittings
- Warping or bending
- Any signs of insect infestation
If you notice any damage, it is important to address it immediately. Depending on the severity, you may need to repair or replace the affected parts.
3. Storing and Transporting
Proper storage and transportation of your wooden backdrop stand play a significant role in maintaining its condition. Here are some tips:
- When not in use, disassemble the stand and store it in a dry and climate-controlled area.
- Protect the individual components by wrapping them in soft cloth or bubble wrap to prevent scratches or damage.
- Avoid storing the stand in areas with extreme temperature or humidity fluctuations, as it can cause warping or cracking.
- During transportation, use a padded carrying case or bag to protect the stand from bumps and impacts.
4. Handling with Care
Be mindful of how you handle and use your wooden backdrop stand to avoid unnecessary wear and tear:
- Avoid placing excessive weight on the stand beyond its recommended capacity.
- Set up the stand on a level surface to ensure stability.
- When adjusting the height or position, do so gently to prevent strain on the joints.
- Always follow the manufacturer’s instructions for assembly and disassembly.
5. Finishing and Refinishing
Over time, the wood finish of your backdrop stand may wear off or become damaged. To refresh its appearance:
- Start by sanding the stand gently to remove any existing finish or imperfections.
- Clean the surface thoroughly to remove any dust or debris.
- Apply a new coat of wood stain or paint using a brush or sponge, following the manufacturer’s instructions.
- Allow the finish to dry completely before reassembling and using the backdrop stand.
Remember to choose a finish that is compatible with the type of wood used in your backdrop stand.
Summary
Maintaining and caring for your wooden backdrop stand is essential to ensure its longevity, performance, and appearance. Regularly clean the stand, inspect for damage, properly store and transport it, handle with care, and consider refinishing when necessary. By following these maintenance tips, you can enjoy the benefits of your wooden backdrop stand for years to come.
FAQs
Q: How to make a wooden backdrop stand?
To make a wooden backdrop stand, you will need four wooden poles of equal length and two wooden crossbars. Attach the crossbars to the top and bottom of the poles using screws or nails. Make sure the crossbars are centered and secure. This will create a stable frame for your backdrop. You can then hang your backdrop or fabric from the crossbars using clips or clamps.
Conclusion:
In conclusion, creating a wooden backdrop stand is a fantastic way to add a touch of elegance and functionality to your photography or event setup. By following the step-by-step instructions and utilizing the necessary tools and materials, you can easily build a sturdy and customizable backdrop stand.
Whether you’re a professional photographer, a DIY enthusiast, or someone who wants to elevate their creative displays, this wooden backdrop stand provides a practical solution. Its versatility allows you to easily change out backdrops for different occasions, making it a valuable addition to your arsenal of photography or event equipment.
So, grab your tools, unleash your creativity, and start building your own wooden backdrop stand today! It’s a rewarding project that can enhance the visual appeal and functionality of your photography sessions or events.
