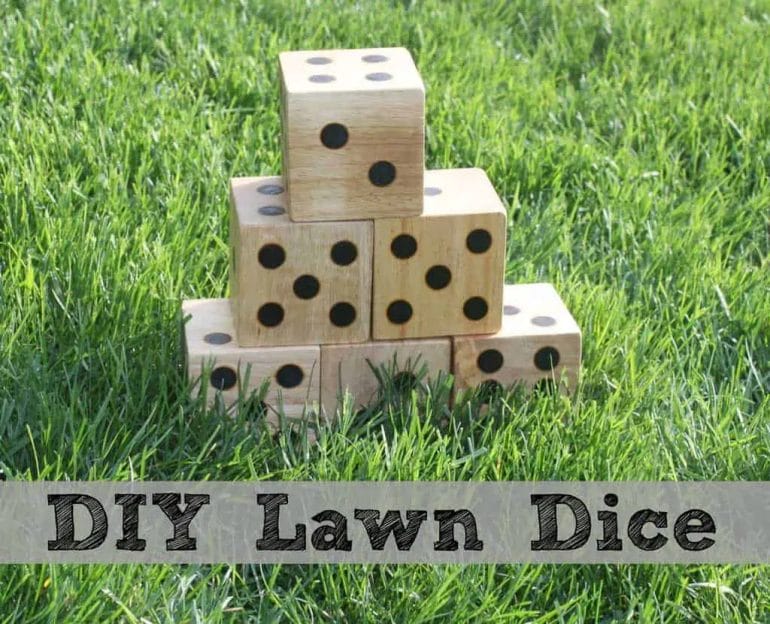
If you’re looking to add a touch of craftsmanship to your next game night, why not try making your own wooden dice? Crafting a wooden dice is a fun and rewarding project that allows you to showcase your woodworking skills while creating a unique and personalized gaming accessory. Whether you’re an experienced woodworker or a beginner looking for a new challenge, this step-by-step guide will walk you through the process of creating your very own wooden dice.
First, you’ll need to gather the necessary materials and tools. Choose a strong and durable wood, such as maple or oak, that is suitable for carving and shaping. Gather a saw, chisel, sandpaper, and a drill to cut and shape the wood. Additionally, you’ll need a ruler or measuring tape to ensure precise dimensions and a wood finish to protect and enhance the beauty of the dice.

Once you have all the materials, begin by cutting the wood into a square shape. Use your ruler or measuring tape to ensure all sides are of equal length. Next, carefully carve each side of the square to create the six faces of the dice. You can choose to carve numbers or dots, depending on your preference.
After carving the faces, use sandpaper to smooth out any rough edges and ensure a polished finish. Pay special attention to the corners to ensure they are rounded and comfortable to roll. Once the dice is smooth to the touch, use a drill to create the divots for
Choosing the right type of wood for your wooden dice
When it comes to making wooden dice, selecting the right type of wood is essential. The choice of wood not only affects the aesthetics of the dice but also plays a significant role in their durability and performance. Here are some factors to consider when choosing the perfect wood for your wooden dice:
1. Hardness
The hardness of the wood is an important factor to consider as it determines the dice’s durability. Hardwoods such as maple, oak, and cherry are popular choices for wooden dice due to their high density and strength. These woods are less likely to chip or dent, ensuring that your dice will withstand countless rolls without compromising their integrity.
2. Grain Pattern
The grain pattern of the wood will greatly influence the appearance of your wooden dice. Different woods have unique grain patterns, ranging from straight, uniform lines to intricate swirls and knots. Consider the aesthetic appeal you desire and choose a wood species that offers a grain pattern that complements your design preferences.
3. Stability
Wood tends to expand and contract with changes in humidity and temperature. It is essential to select a stable wood species that is less prone to warping or splitting. Maple and birch are known for their stability, making them excellent choices for wooden dice that will maintain their shape and function over time.
4. Finishing Options
The type of wood you choose will also affect the finishing options available. Some woods, like maple and beech, have a light color and a smooth grain, making them ideal for staining or painting. Others, such as walnut and mahogany, have a rich, dark tone that can be enhanced with oil or wax finishes. Consider the desired finish for your wooden dice and choose a wood that will best complement your intended aesthetic.
5. Availability and Cost
The availability and cost of the wood should also be taken into consideration. Some exotic wood species may be harder to find and more expensive. If you are on a budget or prefer a more readily available wood, consider options like oak or birch, which offer a good balance between cost and quality.
6. Sustainability
Lastly, if sustainability is important to you, consider choosing a wood species that is responsibly harvested. Look for certifications such as FSC (Forest Stewardship Council) that ensure the wood is sourced from responsibly managed forests. This way, you can enjoy your wooden dice knowing they were made with minimal impact on the environment.
By considering these factors and choosing the right type of wood for your wooden dice, you can create beautiful, durable, and high-performing dice that will enhance your gaming experience.
Step-by-step guide to carving and shaping the wooden dice
Wooden dice can be a unique and beautiful addition to your collection of board games or a great gift for a gaming enthusiast. Carving and shaping wooden dice from scratch can be a rewarding and enjoyable project. In this section, we will provide a step-by-step guide to help you create your own wooden dice.
Materials and tools required
Before you start carving and shaping the wooden dice, gather the following materials and tools:
- A block of wood – Select a hardwood such as maple, oak, or walnut for durability.
- Pencil or marker – For marking the dimensions on the wood.
- Ruler or measuring tape – For precise measurements.
- Saw – To cut the block of wood into a cube shape.
- Carving tools – Such as chisels, gouges, and knives, for shaping and detailing.
- Sandpaper – To smooth the edges and surfaces of the dice.
- Finishing oil or varnish – Optional, for protecting and enhancing the wood.
Step 1: Marking the dimensions
Start by marking the dimensions of the dice on the block of wood using a pencil or marker. Each side of the dice should be of equal length, typically around 1 inch. Use a ruler or measuring tape to ensure accuracy.
Step 2: Cutting the wood
Using a saw, carefully cut the block of wood along the marked lines to create a cube shape. Take your time and make precise cuts to ensure all sides are even and square.
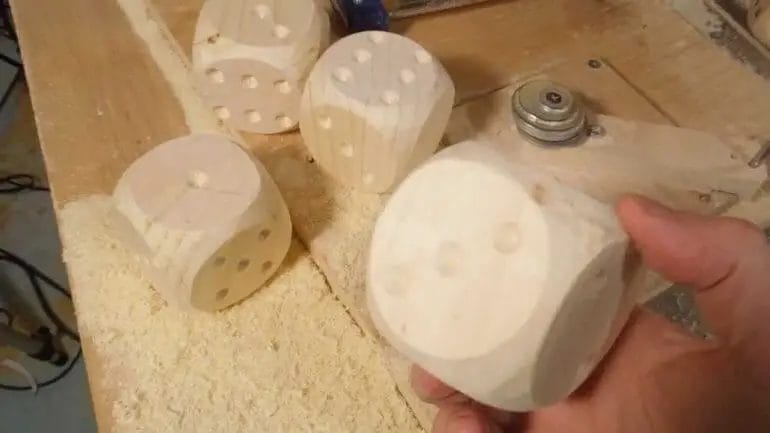
Step 3: Shaping the dice
Now it’s time to shape the dice. Begin by rounding the edges of the cube using carving tools. Gradually remove material from each corner, creating a smooth and rounded appearance. Take care to maintain symmetry and proportions throughout the shaping process.
Once the edges are rounded, you can add additional details to the dice if desired. This can include carving numbers, dots, or symbols on each face using carving tools. Be creative and personalize your dice with unique designs.
Step 4: Sanding the dice
After shaping and carving, use sandpaper to smooth the surfaces of the dice. Start with coarse-grit sandpaper to remove any rough spots or tool marks, then switch to finer-grit sandpaper for a smooth finish. Sand in a consistent motion, following the grain of the wood, until the dice feels smooth to the touch.
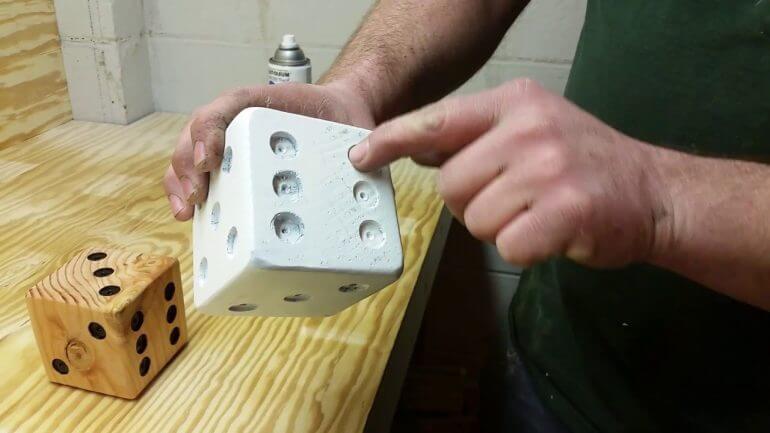
Step 5: Finishing touches
If you prefer, you can apply a finishing oil or varnish to protect and enhance the wood. This step is optional but can give the dice a polished and professional look. Follow the instructions on the chosen product and allow sufficient drying time.
Step 6: Enjoy your wooden dice
Once the finishing touches are complete and the dice is fully dried, your wooden dice is ready to be used and enjoyed. Whether for gaming or display, your handcrafted wooden dice is sure to impress.
In summary, carving and shaping wooden dice is a step-by-step process that requires careful planning, precise measurements, and detailed craftsmanship. With the right materials and tools, you can create unique and personalized wooden dice that will be cherished for years to come.
Adding the Pips or Markings on the Wooden Dice
Wooden dice are a popular choice for many board games and recreational activities. They are not only aesthetically pleasing but also provide a durable and natural feel. One crucial aspect of wooden dice is the addition of pips or markings on their faces. These markings allow players to determine the rolled value of the dice, adding excitement and strategy to the game. In this section, we will explore various methods of adding pips or markings on wooden dice.1. Wood Burning
Wood burning, also known as pyrography, is a technique where heated metal tools are used to create burn marks on the surface of the wood. This method is popular for adding pips on wooden dice as it creates a permanent and visually appealing result. The process involves the following steps:- Choose the appropriate tool: A fine-tipped wood burning pen or soldering iron is ideal for creating precise pips on wooden dice.
- Plan the layout: Decide on the arrangement of pips on each face of the dice. Typically, opposite faces of a standard six-sided dice should add up to seven.
- Practice: Before working on the actual dice, it’s recommended to practice on a scrap piece of wood to get a feel for the tool and develop the desired technique.
- Mark the positions: Use a pencil or fine-tip marker to lightly mark the positions of the pips on each face of the dice.
- Burn the pips: Carefully use the wood burning tool to burn the marked positions, applying even pressure and creating consistent-sized pips.
- Finishing touches: Once all the pips are burned, gently sand the dice to smoothen any rough edges and apply a protective finish, such as varnish, to enhance the appearance and durability.
2. Laser Engraving
Laser engraving is a precise and efficient method for adding pips or markings on wooden dice. This technique utilizes a laser beam to remove material from the wood surface, creating permanent and detailed marks. The process involves the following steps:- Prepare the design: Using graphic design software, create or import the desired pip layout for each face of the dice.
- Select the appropriate laser settings: Adjust the laser power, speed, and focus settings according to the type and thickness of the wood.
- Secure the dice: Place the wooden dice securely in the laser engraving machine, ensuring they are stable and positioned correctly.
- Start the engraving process: Load the design file into the laser engraving software and initiate the engraving process. The laser will precisely remove the wood material to create the desired pips.
- Finishing touches: Once the engraving is complete, clean any residue or dust from the dice and apply a protective finish to enhance the appearance and durability of the markings.
3. Inlaying
Inlaying is a technique where different materials are inserted into a wooden surface to create contrasting and visually appealing designs. This method can be used to add pips or markings on wooden dice by inserting small pieces of colored or contrasting wood into the dice faces. The process involves the following steps:- Prepare the materials: Choose suitable contrasting wood or alternative materials, such as acrylic or metal, to create the pips.
- Design and cut the inlays: Using appropriate tools or a laser cutter, create small pieces or shapes for the pips.
- Prepare the dice faces: Carve or hollow out appropriate cavities on each face of the dice to accommodate the inlays.
- Apply adhesive: Apply a small amount of adhesive, such as wood glue, to the cavities.
- Insert the inlays: Carefully insert the pre-cut inlays into the cavities, ensuring they are aligned and securely in place.
- Finishing touches: Once the adhesive has dried, sand the dice to smoothen any rough edges and apply a protective finish to enhance the appearance and durability of the inlays.
Finishing and Polishing Your Wooden Dice for a Polished Look
Wooden dice are not just a fun and functional addition to your board game collection, but they can also be a beautiful work of art. To truly showcase the natural beauty of the wood and achieve a polished finish, it’s important to properly finish and polish your wooden dice. In this section, we will guide you through the steps to get that desired polished look.
Selecting the Right Finish
The first step in finishing your wooden dice is to choose the right finish. There are various options available, each with its own advantages and considerations. Here are a few popular choices:
- Polyurethane: Polyurethane is a durable and water-resistant finish that provides excellent protection for your wooden dice. It comes in different sheen levels, from glossy to matte, allowing you to achieve the desired look.
- Shellac: Shellac is a natural finish that offers a warm, amber tone to the wood. It is easy to apply and provides good protection against moisture.
- Tung Oil: Tung oil is a popular choice for its ability to enhance the natural beauty of the wood. It provides a smooth, satin finish and is easy to apply and maintain.
Consider the desired appearance, durability, and maintenance requirements when selecting the finish for your wooden dice.
Preparing the Dice for Finishing
Before applying any finish, it’s essential to properly prepare the wooden dice. Follow these steps to ensure a smooth and polished result:
- Sand the Dice: Start by sanding the dice using progressively finer grit sandpaper. Begin with a coarse grit to remove any roughness or imperfections, and then work your way up to a finer grit for a smooth surface.
- Remove Dust: After sanding, use a damp cloth or a tack cloth to remove any dust or debris from the surface of the dice. This will help prevent any imperfections from showing up in the final finish.
- Apply a Pre-Stain Conditioner (optional): If you’re working with a wood species that tends to absorb stain unevenly, consider applying a pre-stain conditioner to ensure a more consistent color.
Applying the Finish
Now that your wooden dice are prepared, it’s time to apply the chosen finish. Follow these steps to achieve a polished look:
- Stir the Finish: Give your chosen finish a good stir to ensure it is well-mixed.
- Apply the Finish: Using a brush, foam applicator pad, or a lint-free cloth, apply a thin and even coat of finish to the wooden dice. Be sure to follow the manufacturer’s instructions for application and drying times.
- Allow Drying: After applying the first coat, allow the dice to dry according to the manufacturer’s instructions. This usually takes a few hours, but it may vary depending on the type of finish used.
- Sand and Repeat (optional): If desired, you can lightly sand the dice between coats to achieve an even smoother finish. Be sure to remove any dust before applying subsequent coats.
- Apply Multiple Coats: Apply additional coats of finish as needed to achieve the desired level of protection and shine. Remember to allow drying time between each coat.
Polishing the Dice
Once you have applied the final coat of finish and it has fully cured, you can proceed to polish the wooden dice to maximize their shine. Here are a few techniques you can use:
- Buffing: Use a soft cloth or buffing pad to gently buff the dice in circular motions. This will help bring out the shine and smooth out any imperfections in the finish.
- Waxing: Applying a layer of wax can further enhance the shine of your wooden dice. Use a wax specifically formulated for wood and follow the instructions for application.
Remember, the key to achieving a polished look is patience and attention to detail. Take your time during each step of the finishing and polishing process for the best results. With proper care and maintenance, your wooden dice will continue to look stunning for years to come.FAQs
1. How can I make a wooden dice?
To make a wooden dice, you will need a block of wood, measuring and marking tools, a saw, sandpaper, and wood finish. Start by cutting the block into a cube shape. Then, mark and carve the numbers on each face. Sand and smooth all surfaces, and apply a wood finish for protection and a polished look.
2. What type of wood is best for making a wooden dice?
Hardwoods like maple, cherry, or walnut are good choices for making a wooden dice. They are durable and provide a smooth surface for carving the numbers. Avoid softwoods like pine, as they may not hold up well to wear and tear.
3. Are there any safety precautions to keep in mind while making a wooden dice?
When working with tools, always wear safety goggles and gloves to protect yourself. Use caution when cutting with a saw and take your time to prevent accidents. It is also important to work in a well-ventilated area and follow any instructions or guidelines provided by the tools or materials you are using.
Conclusion
In conclusion, making a wooden dice can be a fun and creative DIY project for both beginners and experienced woodworkers. By following a few simple steps, you can create a unique and personalized wooden dice for gaming purposes or as a decorative item. Remember to choose a durable and high-quality wood, accurately measure and cut the dice’s sides, and use sandpaper to smooth out any rough edges. Additionally, adding decorative touches like numbers or symbols can enhance the aesthetic appeal of the wooden dice. So, grab your tools and get ready to roll with your very own handcrafted wooden dice!
